Install/Upgrade Automation API Feature on AWS with ECR
In this guide, we'll run you through the installation steps of Automation API. Installing theAutomation API with your on-premise QMetry installations will enable several automation APIrelated features including faster automation result file imports into QMetry.
Automation API Installation Options
Option 1: If you want to use the same server on which the QTM Application is installed, thenyou can install Automation API on it.
Option 2 (Recommended): If you are going to make heavy usage of Automation API, thenwe strongly recommend you install Active MQ, Automation API, and Redis Caching on aseparate server.
If you are opting for Option 2, the following are hardware requirements for Active MQ andAutomation API Server.
Small Teams < 50 users | Medium Teams < 500 users | Large Teams 500+ users | ||||
|---|---|---|---|---|---|---|
Min | Recommended | Min | Recommended | Min | Recommended | |
Memory | 4 GB | 8 GB | 8 GB | 16 GB | 16 GB | 32 GB |
CPUs | 2 Core | 4 Core | 4 Core | 12 Core | 12 Core | 24 Core |
Installation Requirements
QMetry Application should be pre-installed.
Redis server configured with QTM Application.
Active MQ server configured with QTM Application.
Pre-requisites for the Installation
QMetry Application should have been installed.
All the servers should have the support of these commands: unzip, curl, and vim.
Docker installation requires root user access.
Get the “QMetry_Linux_Installer_ECR.zip” file from QMetry Support.
The following should be installed on the server:
AWS - Amazon Linux 2024, Ubuntu 24.04
Docker Version 20.10.13
Docker Compose Version v2.40.3
Yum-tools
Make sure that the docker service has been configured on the server to start automatically onreboot of the server.
The Internet-enabled machine on which the docker images are downloaded should supportthe docker command.
The following Ports should be open:
Installation
Ports that need to be enabled and should beavailable for use
Redis CachingServer
6379
Active MQ Server
8181 & 61616
Automation API Server
8081
Download Docker Images
QMetry Application's Server and QMetry Report's Server must have appropriate IAM rolesassigned to communicate with various other AWS services like AWS ECR, AWS RDS, etc.
Configure AWS EC2 to authenticate with AWS ECR service:
Install and configure AWS Credential Helper. If you want to use AWS IAM Role basedauthentication mechanism for ECR authentication from AWS EC2, then follow this step. Else,skip this step and make sure that you have done authentication with AWS ECR from QMetry andReport EC2 server before moving to the next step. (Reference: Automatically gets credentials for Amazon ECR on docker push/docker pull)
Placing QMetry and Report Docker Images on the AWS ECR
Get Docker Image and place it on ECR. Perform these steps from the machine from which Docker Hub Container Image Library | App Containerization is accessible. It is required to havedocker tool installed on this machine. Also, make sure that you have credentials for the ECR. In this step, we will download QMetry and Report docker image from docker repository and push it to the ECR repository.
Follow the steps mentioned below:
Step 1.1 Execute the following command. Next, you will be asked for docker credentials. Enter docker credentials shared as part of the installation package.
docker login
Pull the Redis, ActiveMQ, and automation docker images from docker repository.
docker pull qmetry/qmetry:redis840
docker pull qmetry/qmetry:activemq_latest
docker pull qmetry/qmetry:automation_latest
Tag QMetry and Report docker images with the ECR.
docker tag qmetry/qmetry:redis840 <ECR_Repo_Url>/qmetryapp:redis840
docker tag qmetry/qmetry:activemq_latest
<ECR_Repo_Url>/qmetryapp:activemq_latest
docker tag qmetry/qmetry:automation_latest
<ECR_Repo_Url>/qmetryapp:automation_latest
If you have set up and configured the AWS Credentials Helper utility on EC2 servers, then skip this step and move to the next step.
Log in with AWS ECR.
If you have ECR credentials, then log in with ECR using it.
docker login <ECR_Repo_Url>
If you have AWS CLI installed and configured on EC2, then you can use the following method to do authentication with ECR.
aws ecr get-login-password --region <regionID> | docker login --
username AWS --password-stdin <ECR_Repo_Url>
Step 1.5 Push QMetry and Report docker images to ECR.
docker push <ECR_Repo_Url>/qmetryapp:redis840
docker push <ECR_Repo_Url>/qmetryapp:activemq_latest
docker push <ECR_Repo_Url>/qmetryapp:automation_latest
Step 2. Install/Upgrade Redis Server
Note
Starting with QMetry 8.25.2, all QMetry components for installation and upgrades are bundled into a single zip file. Use:
install.sh — for fresh installations
upgrade.sh — for upgrading from an older version to 8.25.2
Follow the steps mentioned below.
2.1 Copy the QMetry_Linux_Installer_ECR.zip installation file received from QMetry Support to your server and unzip it. Navigate to the directory where these files are saved.
unzip QMetry_Linux_Installer_ECR.zip
cd QMetry_Linux_Installer_ECR
ls -ltr
Execute the following commands.
sudo su
chmod +x install.sh OR
sh install.sh

---OR---

sudo su
chmod +x upgrade.sh
sh upgrade.sh
Then you will be asked for credentials. Enter docker credentials shared as part of the installation package.
QMetry script will prompt for the install/upgrade mode and the registry URLas follows.
Options
Enter Value
Do you want to make an online installation (Y/N)?
Y
Please enter Docker registry URL
<input_ecr_url>
The ECR install/upgrade menu appears:
========== QMetry ECR Install/Upgrade Menu ==========
2 1. QMetryApp
3 2. QMetry Report
4 3. QMetry Redis
5 4. QMetry ActiveMQ
6 5. QMetry BDD
7 6. QMetry Automation
8 0. Exit
9 =============================================
10 Enter your choice:
Type 3 and press Enter.
The installation may take a while.
Note
After each component completes installation or upgrade, the menu will reappear. Please select the next option and proceed accordingly.
The recommended sequence is:
Redis (Option 3)
ActiveMQ (Option 4)
Automation (Option 6)
After the above steps are completed, log in to the QMetry application.
(This step can also be done after you have installed/upgraded all the components, Redis, ActiveMQ, and automation)
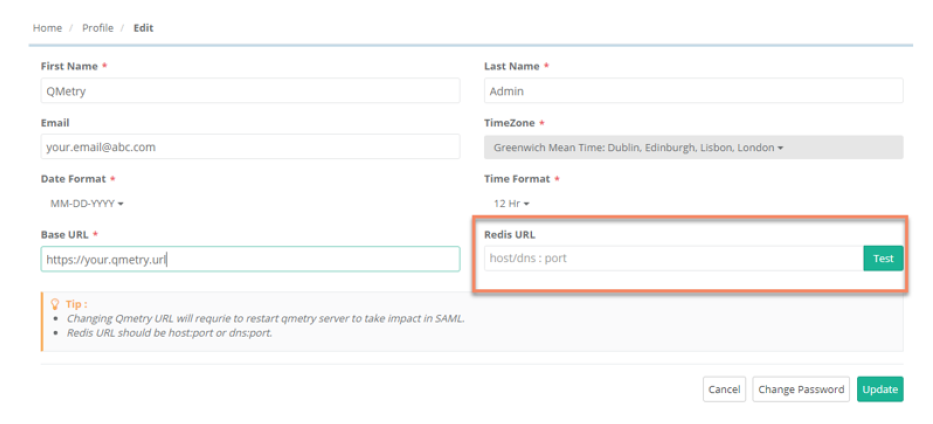
Go to QMetry > Login as "Admin" > Profile and Edit the Profile.
Update QMetry Redis URL.
Note
Configure Redis with QMetry Application on UI as mentioned in 2.4.
If you are facing any issues from the QMetry Application side after 2.4, then you may be required to restart the QMetry Application docker container after 2.4.
docker restart qmetry_app_1
Step 3. Install/Upgrade Active MQ
The installation may take a while.
3.1 As explained above, you will be prompted with the ECR install/upgrade menu again, as shown below:
========== QMetry ECR Install/Upgrade Menu ==========
1. QMetryApp
2. QMetry Report
3. QMetry Redis
4. QMetry ActiveMQ
5. QMetry BDD
6. QMetry Automation
0. Exit
 =============================================
Enter your choice:
Type 4 and press Enter.
Follow the steps mentioned below.
The next question during the process will be as follows.
Options
Details
Default Values
Examples
Enter activemq username
-
-
admin
Enter activemq password
-
-
admin
Configure the Active MQ in QMetry Application.
After the above steps are completed, log in to the QMetry application.
Go to QMetry > Login as "Admin" > Profile and Edit the Profile.
Update MQ URL, MQ Username, and MQ Password.
The ActiveMQ URL should be in the format of "ssl/dns:port".
For example, "tcp://<activeMQ-Host>:61616"
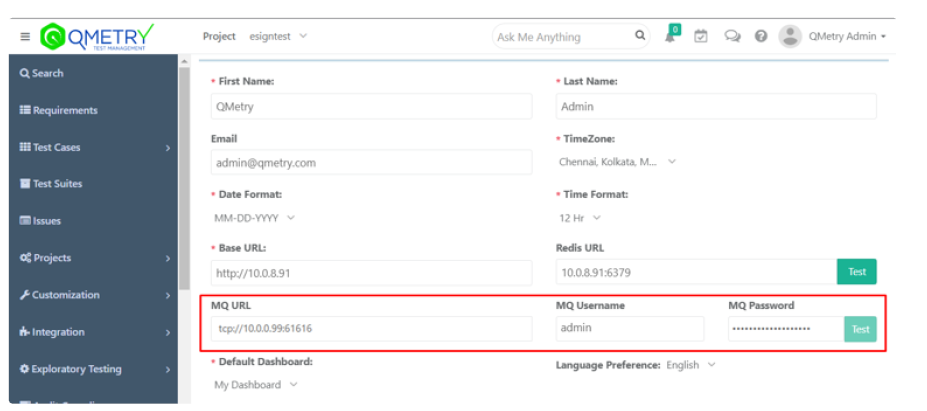
Restart the QMetry Application docker container: docker restart qmetry_app_1
Step 4: Install / Upgrade Automation API Server
4.1 As explained above, you will be prompted with the ECR install/upgrade menu again, as shown below:
========== QMetry ECR Install/Upgrade Menu ==========
1. QMetryApp
2. QMetry Report
3. QMetry Redis
4. QMetry ActiveMQ
5. QMetry BDD
6. QMetry Automation
0. Exit
 =============================================
Enter your choice:
Enter your choice: 6.
The next question during the process will be as follows.
Users are required to enter the value of the following configuration parameters.
Options
Details
Default Value
Example
Enter QMetry(QTM) database host (localhost)
Note: In case of AWS installation enter the private IP of the AWS instance where the QTM Application's database is installed.
localhost
QTM Application's database host
Enter QMetry(QTM) database port (3306)
-
3306
3306
Enter QMetry(QTM) database schema (qmetry)
-
qmetry
qmetry
Enter QMetry (QTM) database user (root)
-
root
root
Enter QMetry (QTM) database password
-
-
qmetry
Enter QMetry (QTM) database minconnection (32)
-
32
32
Enter QMetry (QTM) database maxconnection (50)
-
50
50
Enter minthreads (2)
-
2
2
Enter maxthreads (2)
-
2
2
Enter Redis host(localhost)
Note : In case ofAWS installation,enter the privateIP of the AWSinstance whereRedis is installed.
localhost
redis host
Enter Redis port(6379)
-
6379
6379
Enter MQ URL(tcp://localhost:61616):
Note : In case ofAWS installation,enter the privateIP of the AWSinstance whereRedis is installed.For example: tcp://10.0.0.16:61616
tcp://localhost:61616
tcp://<activeMQ-Host>:61616
Enter MQ user(admin)
-
admin
admin
Enter MQ password
-
admin
-
The installation may take a while.
Exit from the script
Once all components are upgraded, enter 0 to exit the install/upgrade menu.
If you are facing any issues during the installation process, kindly generate a support ticket on the for assistance.