QMetry and Reports Installation on AWS (using RDS & ECR)
This guide walks you through installing QMetry Test Management and QMetry Reports on Amazon Web Services (AWS) using AWS RDS for database services and AWS ECR for container image storage.
Architecture Overview:
Component | Role |
|---|---|
Server 1 — QMetry Application | Hosts the QMetry Test Management application container |
Server 2 — QMetry Reports | Hosts the QMetry Advanced Reporting container |
AWS RDS 1 — QMetry App DB | MySQL v8.4.8 database for QMetry application data |
AWS RDS 2 — QMetry Reports DB | MySQL v8.4.8 database for QMetry Reports data |
Pre-requisites
Before beginning the installation, ensure all the following requirements are satisfied. For additional information on verifying pre-requisites, refer to the QMetry Knowledge Base.
Operating System & Server
QMetry installation is supported on Linux - Amazon Linux 2024, Ubuntu 24.04 only. No other operating systems are certified.
Four servers are required:
2 AWS RDS instances: one for QMetry Application DB, one for QMetry Reports DB
1 EC2 server: QMetry Application
1 EC2 server: QMetry Reports
All servers must have the following utilities installed: unzip, wget, curl, and vim.
Internet access must be enabled on all servers. It is required to download and install Docker and QMetry installation images.
Ensure no proxy servers are blocking downloads from the internet.
Firewall and SELinux must be disabled on all servers during QMetry installation.
IMPORTANT: For Report installation, it is mandatory to have ActiveMQ pre-installed and running. Ensure you have details of Amazon MQ – Apache ActiveMQ instance ready.
Network & Port Requirements
The following ports must be open for incoming connections on their respective servers:
Server/Service | Required Ports |
|---|---|
AWS RDS — QMetry Application DB | 3306 |
AWS RDS — QMetry Reports DB | 3306 |
QMetry Application Server | 80/443 |
QMetry Reports Server | 80 / 443, 8081, 3306 |
AWS EFS | 2049 |
AWS ElastiCache (Redis — optional) | 6379 |
Warning
Ports 80/443 and 3306 on their respective servers must not be in use by any other application.
Port 8080 must be open on the Reports Server to allow connections from the QMetry Application Server.
The QMetry App Server must also be able to communicate with the Reports Server on port 3306.
Storage
By default, docker is managing storage under “/var/lib/” directory on the host machine. Installer will ask you to set up a storage location for QMetry application files related data during the installation of QMetry. Hence, make sure that both the directories have required disk space available as per usage requirement of QMetry application.
Note
It is recommended to create the QMetry file system using the AWS EFS service so it can be shared across all QMetry application nodes.
Protocol Consistency
After installation, QMetry Application and the Reports tool must both be configured to use the same protocol — either http or https consistently.
Important
If you plan to integrate QMetry with Jira and Jira is running on https, QMetry must also run on https. Both applications must use the same protocol.
IAM Roles & ECR Authentication
Both the QMetry Application Server and the QMetry Reports Server must have appropriate IAM roles assigned to communicate with AWS services such as AWS ECR and AWS RDS.
Configuring AWS EC2 to Authenticate with AWS ECR
Install and configure the AWS Credential Helper. If you want to use AWS IAM Role-based authentication for ECR from your EC2 instances, follow this step. Otherwise, skip this step and ensure you have manually authenticated with AWS ECR from both the QMetry and Reports EC2 servers before proceeding.
(Reference: GitHub - awslabs/amazon-ecr-credential-helper: Automatically gets credentials for Amazon ECR on docker push/docker pull)
Installation Files
Obtain the following files from QMetry Support before beginning the installation:
QMetry_Linux_Installer_ECR.zip
Docker credentials required for installation (provided with the installation package).
Placing QMetry and Report Docker Images on AWS ECR
Get Docker Image and place it on ECR. Perform these steps from the machine from which Docker Hub Container Image Library | App Containerization is accessible. It is required to have docker tool installed on this machine. Also, make sure that you have credentials for the ECR. In this step, we will download QMetry and Report docker image from docker repository, tag them for your ECR, and push them to your ECR repository.
Step 1. Log in to the Docker Repository
Execute the following command and enter the Docker credentials provided with your installation package when prompted.
docker login
Step 2. Pull the QMetry and Report Docker Images
Pull the three required images from the docker repository:
docker pull docker.io/qmetry/qmetry:latest
docker pull docker.io/qmetry/qmetry:cdc_latest
docker pull docker.io/qmetry/qmetry:sync_latest
Step 3. Tag the Images with your ECR Repository URL
Replace <ECR_Repo_Url> with your actual ECR repository URL:
docker tag docker.io/qmetry/qmetry:latest <ECR_Repo_Url>/qmetryapp:latest
docker tag docker.io/qmetry/qmetry:cdc_latest <ECR_Repo_Url>/qmetryreport:cdc_latest
docker tag docker.io/qmetry/qmetry:sync_latest <ECR_Repo_Url>/qmetryreport:sync_latest
Step 4. Authenticate with AWS ECR
If you have already configured the AWS Credentials Helper utility on your EC2 servers, skip this step and proceed to Step 5.
Login with AWS ECR.
If you have ECR credentials, then log in with ECR using it.
docker login <ECR_Repo_Url>
Authenticate using the AWS CLI (if AWS CLI is installed and configured):
aws ecr get-login-password --region <regionID> | docker login --username AWS --password-
Step 5. Push the Images to your ECR Repository
Push all three tagged images to ECR:
docker push <ECR_Repo_Url>/qmetryapp:latest
docker push <ECR_Repo_Url>/qmetryreport:cdc_latest
docker push <ECR_Repo_Url>/qmetryreport:sync_latest
Create and Configure AWS RDS Instances
This section guides you through creating and configuring two MySQL RDS instances: one for the QMetry Application database and one for the QMetry Reports database. Both instances share a common parameter group configuration that must be set up before creating the databases.
Create DB Parameter Groups
You need to create two separate DB parameter groups: one for the QMetry Application RDS and one for the QMetry Reports RDS.
Open the AWS Management Console and navigate to the Amazon RDS console.
In the navigation pane, select Parameter groups.
Click Create parameter group.
Configure the parameter group with the following settings:
Engine type: MySQL Community
Parameter group family: mysql8.4
Group name: Provide a descriptive name for the new DB parameter group.
Description: Provide a meaningful description.
Click Create.
Repeat this process to create a second parameter group for the Reports RDS.
Configure the APP RDS Parameter Group
Select Parameter Groups from the left panel and choose the App parameter group created in Step 1. Edit its parameters with the following values:
Parameter | Value | Description |
|---|---|---|
binlog_format | ROW | Sets binary logging to row-based replication format |
character_set_client | utf8mb4 | Character set for client connections (supports full Unicode) |
character_set_server | utf8mb4 | Default server character set (supports full Unicode) |
collation_server | utf8mb4_unicode_ci | Default server collation for Unicode comparison |
connect_timeout | 30 | Seconds the server waits for a connect packet before timeout |
group_concat_max_len | 500000000 | Maximum allowed result length for GROUP_CONCAT() |
innodb_autoinc_lock_mode | 2 | Interleaved lock mode for high-concurrency inserts |
innodb_log_buffer_size | 536870912 | InnoDB redo log buffer size (512 MB) |
innodb_thread_concurrency | 10 | Max threads permitted inside InnoDB kernel |
log_bin_trust_function_creators | 1 | Allows non-SUPER users to create stored functions with binary logging |
log_output | FILE | Destination for general and slow query logs |
lower_case_table_names | 1 | Stores table names in lowercase for case-insensitive lookups |
max_allowed_packet | 536870912 | Maximum packet size for communication buffer (512 MB) |
require_secure_transport | 1 | Enforces encrypted (SSL/TLS) connections to the server |
restrict_fk_on_non_standard_key | OFF | Allows foreign keys on non-unique/non-primary key columns |
sort_buffer_size | 1048576 | Buffer size allocated per session for sort operations (1 MB) |
sql_mode | NO_ENGINE_SUBSTITUTION, STRICT_TRANS_TABLES, ERROR_FOR_DIVISION_BY_ZERO | SQL mode flags governing query validation and error handling |
thread_cache_size | 200 | Number of threads cached for reuse by new connections |
Configure the Report RDS Parameter Group
Select the Report parameter group created in Step 1. Edit its parameters with the following values:
Parameter | Value | Description |
|---|---|---|
group_concat_max_len | 500000000 | Maximum allowed result length for GROUP_CONCAT() |
innodb_autoinc_lock_mode | 2 | Interleaved lock mode for high-concurrency inserts |
innodb_strict_mode | 0 | Disables strict InnoDB checks for compatibility |
lower_case_table_names | 1 | Stores table names in lowercase for case-insensitive lookups |
max_allowed_packet | 536870912 | Maximum packet size for communication buffer (512 MB) |
require_secure_transport | 1 | Enforces encrypted (SSL/TLS) connections to the server |
restrict_fk_on_non_standard_key | OFF | Allows foreign keys on non-unique/non-primary key columns |
tmp_table_size | 268435456 | Max size of internal in-memory temporary tables (256 MB) |
Create the QMetry Application RDS
Create a new RDS instance with MySQL database version 8.4.8.
Provide an RDS Name, Username, and Password.
Under the parameter group settings, select the Application DB Parameter Group created in Step 4.2 above.
Start the RDS service: navigate to RDS > Databases > Actions > Start RDS Service.
Connect to the QMetry Application RDS and execute the following query. This ensures that MySQL binary logs are retained for 24 hours when the RDS restarts — which is essential for reliable Reports data synchronization.
call mysql.rds_set_configuration('binlog retention hours', 24);
Save the following details for use during QMetry Application installation:
RDS username
RDS password
RDS database schema name
RDS endpoint
4.5 Create the QMetry Reports RDS
Create a new RDS instance with MySQL database version 8.4.8.
Provide an RDS Name, Username, and Password.
Under the parameter group settings, select the Reports DB Parameter Group created in Step 4.3 above.
Connect to the QMetry Reports RDS and create the reports database schema by executing the following query:
CREATE SCHEMA `qtmanalytics` DEFAULT CHARACTER SET utf8mb4 COLLATE utf8mb4_unicode_ci;
Save the following details for use during QMetry Reports installation:
RDS username
RDS password
RDS database schema name (qtmanalytics)
RDS endpoint
5. Installing the QMetry Application
5.1 Pre-Installation Recommendations
Create a file system for QMetry using the AWS EFS service. This EFS can be shared across all QMetry Application nodes.
Ensure port 2049 is open for incoming connections in the security group to allow connections from your AWS EC2 instances.
When creating the EC2 instance for the Application Server, go to Configure Storage > File Systems > EFS and select the file system created in the previous step.
Refer to the AWS Official Documentation for attaching an EFS file system when creating an EC2 instance.
Mount the EFS to an appropriate directory on the EC2 server. For example, if you choose /opt/qmetryapp as the target directory, specify this path when prompted during installation.
5.2 Installation Steps
Step 1. Extract the Installer Package
Copy the “QMetry_Linux_Installer_ECR.zip” file received from QMetry Support to your server. Navigate to the directory containing the file and execute the following commands:
sudo su -
unzip QMetry_Linux_Installer_ECR.zip
cd QMetry_Linux_Installer_ECR
Step 2. Run the Installation Script
Execute the installation script:
chmod +x install.sh
./install.sh
The installer will prompt you with the following question:
Option | Allowed Values | Default Value |
|---|---|---|
Do you want to make an online installation (Y/N)? | Y, y, N, n | Y |
Enter docker repository URL | <Your ECR URL> | - |
You will then be prompted for credentials. Enter the Docker credentials provided with your installation package.
Note
If AWS server has appropriate permission to download docker image from the ECR, then installation process will move forward with the next step. Otherwise, it will prompt for adding correct authentication details for the specified ECR URL.
Step 3. Select the QMetry Application Component
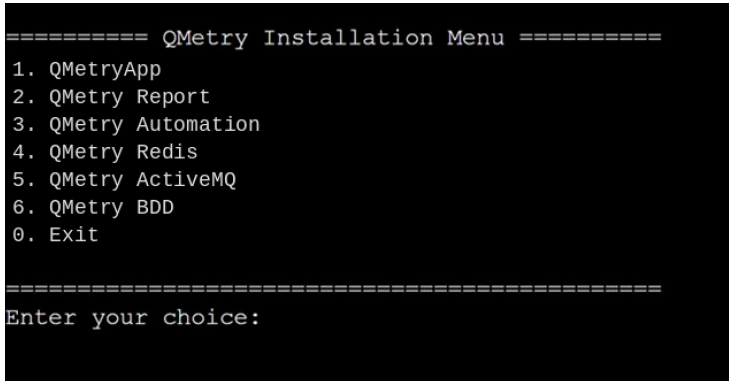
The installer will display options to install various QMetry components. Enter 1 to install the QMetry Application container and press Enter.
Step 4. Specify Application Data and Log Directories
The installer will prompt for the following directory paths:
Prompt | Description | Example |
|---|---|---|
Please enter QMetry application directory | Enter the EFS-mounted directory path for storing QMetry application files (attachments, license, import/export files, etc.) | /opt/qmetryapp |
Please enter QMetry application log directory | Enter a directory path for QMetry application log files. This directory must NOT be shared across multiple nodes. | /opt/qmetrylogs |
Important
It is recommended to take periodic backups of the application data directory to prevent data loss in the event of a disaster.
Step 5. Enter QMetry Database and Application Parameters
Once the script has completed extracting files, it will prompt for the following configuration parameters. Have your RDS details from Section 4 ready.
Parameter | Description | Default | Example |
|---|---|---|---|
Enter QMetry Database Hostname | QMetry Database Host as DNS/IP Address (RDS Endpoint) | <RDS DB Endpoint> | <RDS DB Endpoint> |
Enter QMetry Database Port | Database port — use 3306 unless changed | 3306 | 3306 |
Enter QMetry Database Schema | QMetry Application Database schema name | qmetry | qmetry |
Enter QMetry Database Username | QMetry Application Database root username | - | dbadmin |
Enter QMetry Database Password | QMetry Application Database root password | — | QMetry@123 |
Enter Email for QMetry admin user | Admin user email address | — | admin@qmetry.com |
Enter password for QMetry admin user | Admin user password | — | Admin@123 |
Enter Min. Heap Memory (GB) | Minimum heap memory for the web server in GB | 2 | 2 |
Enter Max. Heap Memory (GB) | Maximum heap memory for the web server in GB | 4 | 4 |
Enter QMetry DB Connection Pool Size | Database connection pool size | 100 | 100 |
The installation may take several minutes to complete. Upon successful completion, you will see the message:
QMetry Application installation is complete.
Step 6. Exit the Installer
Enter 0 to exit the installation menu.
Step 7. Obtain and Apply Your QMetry License
Evaluation License:
If you are evaluating QMetry, an evaluation license valid for 30 days should have been included with your installation package.
Commercial License:
To generate a commercial license, QMetry Support requires your server's domain name and MAC address. Follow these steps:
Execute the following command to retrieve your server's MAC address:
ifconfig # Note the MAC address of the Ethernet card, e.g., eth0 or eth1
Send the MAC address and the server's domain name to QMetry Support at: qtmsupport@smartbear.com.
Once you receive the license.key file, apply it following the Steps to Apply License documentation
Step 8. Access the QMetry Application
Access the QMetry application in your web browser using the following URL:
http://<your-IP-Address-or-Domain-Name>
Use the following default credentials to log in for the first time:
Field | Value |
|---|---|
Username | admin |
Password | <Password specified in Step 5 above> |
Step 9. Complete the Admin Profile Configuration
After logging in as admin, complete the following configuration:
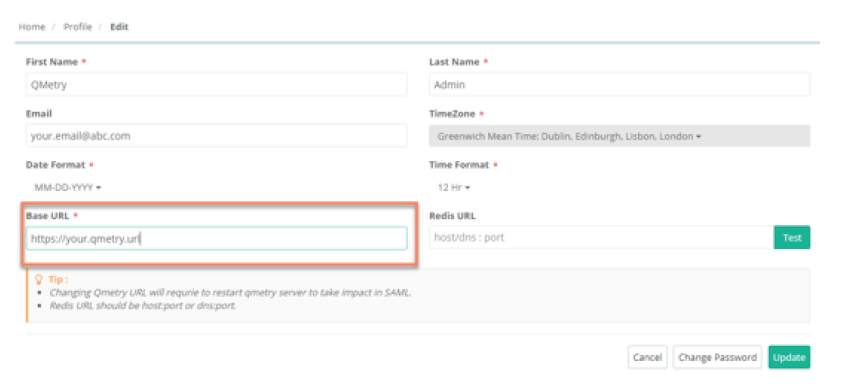
Navigate to the top-right corner and click Admin > Profile > Edit Profile.
Update the Email field with the correct admin email address.
Enter the Base URL — set this to your QMetry server URL.
Save the changes.
Step 10. Optional: Adjust Tomcat Heap Memory
QMetry is installed with default minimum and maximum heap memory settings. These can be modified based on your hardware configuration. Refer to the Additional Configuration documentation for details.
Installing QMetry Reports
This section applies only if you have purchased the QMetry Advanced Reporting add-on. A dedicated server is required for the Reports installation.
Step 1. Extract the Installer Package
Copy the `QMetry_Linux_Installer_ECR.zip` file received from QMetry Support to your Reports server. Navigate to the directory containing the file and execute the following commands:
sudo su -
unzip QMetry_Linux_Installer_ECR.zip
cd QMetry_Linux_Installer_ECR
Step 2. Run the Installation Script
Execute the installation script:
chmod +x install.sh
./install.sh
The installer will prompt you with the following question:
Option | Allowed Values | Default Value |
|---|---|---|
Do you want to make an online installation (Y/N)? | Y,y,N,n | Y |
Enter docker repository URL | <Your ECR URL> | - |
You will then be prompted for credentials. Enter the Docker credentials provided with your installation package.
Note
If the AWS server has the appropriate IAM permissions to pull the Docker image from ECR, installation will continue automatically.
Otherwise, the installer will prompt you to provide correct ECR authentication details.
Step 3. Select the QMetry Reports Component and Enter Configuration
When the installer displays the component selection menu, enter 2 to install the QMetry Reports container.
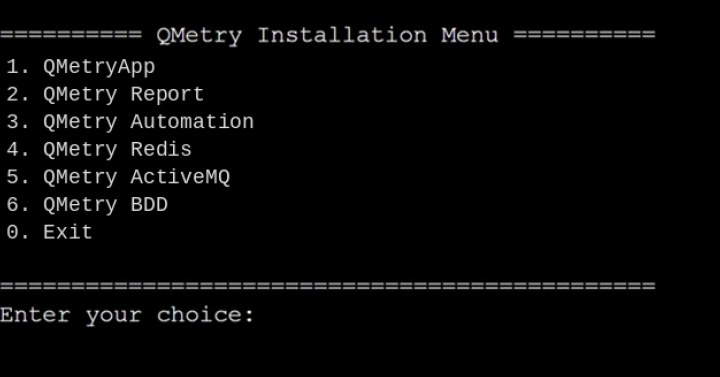
The installer will then prompt for the following configuration parameters. Have your RDS details for both databases ready.
Parameter | Description | Example |
|---|---|---|
Enter App Database Host URL | Hostname or IP address of the QMetry Application DB (RDS Endpoint) | 10.0.8.166 |
Enter App Database Port | Port for the QMetry Application Database | 3306 |
Enter App Database Username | Username for the QMetry Application database | root |
Enter App Database Password | Password for the QMetry Application database | root |
Enter App Database Schema Name | Schema name of the QMetry Application database | qmetry |
Enter Report Database Host URL | Hostname or IP address of the QMetry Reports DB (RDS Endpoint) | 10.0.8.221 |
Port for the QMetry Reports database | Port for the QMetry Reports database | 3306 |
Enter Report Database Username | Username for the QMetry Reports database | root |
Enter Report Database Password | Password for the QMetry Reports database | root |
Enter Report Database Schema | Schema name of the QMetry Reports database | qtmanalytics |
Enter MQ URL | ActiveMQ URL of the QMetry Application server | tcp://10.0.8.166:61616 |
Enter MQ Username | Enter MQ Username | admin |
Enter MQ Password | Enter MQ Username | admin |
Max memory for CDC app (GB) | Maximum memory allocation for the CDC container:
| 4 |
Max memory for Sync app (GB) | Maximum memory allocation for the Sync container:
| 8 |
CPUs for CDC app | Number of CPUs to allocate for the CDC container | 4 |
CPUs for Sync app | Number of CPUs to allocate for the Sync container:
| 4 |
Upon successful completion, you will see the message & 2 containers installed as below:
Step 4. Exit the Installer
Enter 0 to exit the installation menu.
Step 5. Configure Insight Configuration in the QMetry Application
After installation, configure the database connection from within the QMetry Application:
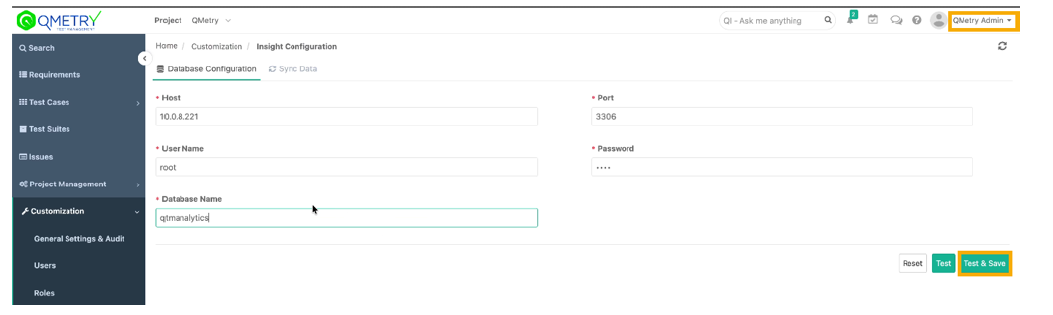
Log in to QMetry Application with admin credentials.
Navigate to Customizations > Insight Configuration > Database Configuration tab.
Enter the following connection details:
Host: Enter the Report Database Host URL
Port: 3306
Username: <Report database username>
Password: <Report database password>
Database Name: <Report DB schema name specified during installation>
Click Test to verify the connection. Upon a successful test, click Test & Save to save the configuration.
Step 6. Set Up Report Data Sync
Under the Sync Data tab within Insight Configuration, configure the Report Data Sync from your Reports server to QMetry Reporting:
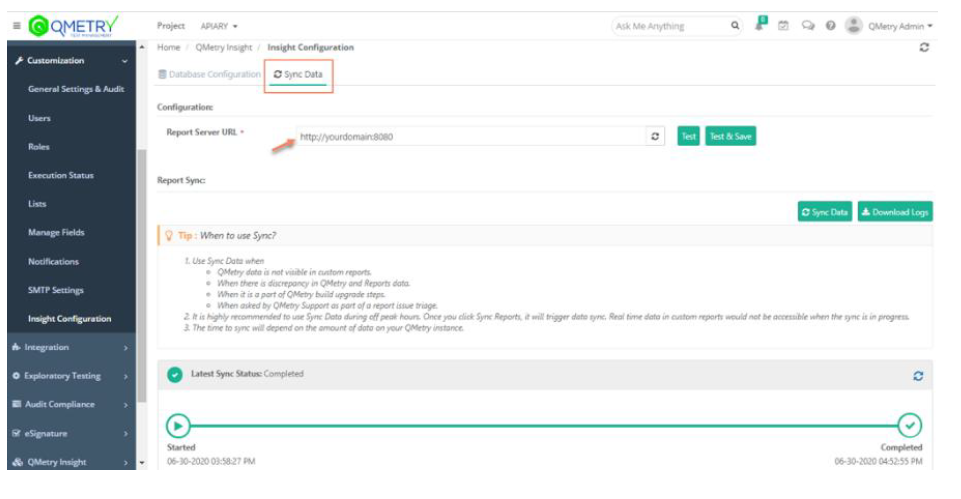
In the Report Server URL field, enter your Reports server domain URL followed by port 8081. For example: http://<reports-server-domain>:8081
Click Test to verify the connection, then click Test & Save.
Warning
Ensure port 8081 is open on the Reports Server before testing the connection.
Note
Your QMetry and Reports installation is now complete.
Step 7. Enabling Redis Caching Cluster (Optional)
QMetry supports Redis Caching to improve overall application performance and scalability. This step is optional and can be performed at any time after the base installation.
Create a Redis cluster using the AWS ElastiCache service. Use Redis version 7.1.0.
Ensure the AWS ElastiCache Redis Cluster is accessible to all QMetry Application EC2 servers:
Port 6379 must be open for incoming connections in the security group to allow connections from AWS EC2.
Port 6379 must not be in use by any other application on the server.
Configure the Redis connection within the QMetry Application:
Log in to QMetry Application using the admin account.
Go to the top-right corner: Admin > Profile > Edit Profile.
Enter the Redis URL in the provided field and click Test.
If the test fails, verify network connectivity between the AWS ElastiCache Redis Cluster and your EC2 instances.
Once the test succeeds, save the configuration.
Step 8. Installing Automation API Features (Optional)
Installing the Automation API alongside your QMetry installation enables several automation-related features, including faster automation result file imports into QMetry.
If you plan to use Automation APIs to import test results into QMetry, refer to the Installation for Automation API documentation available on the QMetry Support Portal.
Troubleshooting & Support
If you encounter any issues during the installation process, please create a support ticket on the QMetry Support Portal for assistance.
Contact | Details |
|---|---|
QMetry Support Portal | https://support.qmetry.com |
QMetry Professional Support Email | qtmsupport@smartbear.com |