QMetry Reports Online Upgrade Document for Linux
In this guide, we will run you through upgrading QMetry Test Management Reports in your environment. These steps are to be followed on your QMetry Reports server hosted on the Linux machine.
Pre-requisites
Docker and Docker Compose must be installed and running, and you must have sudo privileges.
The extracted upgrade directory must contain upgrade.sh, the existing config.properties, and the compose files (cdc.yml, sync.yml, and reportdb.yml for a fresh install). For an offline upgrade, the required .tar image files must also be present.
Ensure the reports sync port is open on the reports server so the post-upgrade sync can connect.
Steps to upgrade existing QMetry Reports to the latest version
Upgrade Steps
Step 1: Download Required Files
Get the latest version of QMetry Upgrade Installer from the QMetry Support Portal.
Download the QMetry_Linux_Installer.zip file on your report server's /opt directory once you receive the report upgrade package.
Step 2. Check the running containers
sudo su
docker ps -a --format "table {{.ID}}\t{{.Names}}\t{{.Image}}"
Step 3. Extract the upgrade package
cd /opt
unzip QMetry_Linux_Installer.zip
cd QMetry_Linux_Installer
Step 4. Modifying the container name (Optional)
If your QMetry Reports container name differs from the default, open upgrade.sh and update the container-name variable to match the name fetched in Step 2; otherwise skip this step.
vi upgrade.sh
# press i to edit, then set:
OLD_CONTAINER_NAME=<existing container's name>
# press Esc, then type :wq to save
Step 5. Run the upgrade script and choose online or offline
chmod +x upgrade.sh
./upgrade.sh # you will be prompted for online/offline
# or pass the install type directly:
./upgrade.sh Y # online (pulls images from registry)
./upgrade.sh N # offline (uses local .tar image files)
When prompted, respond to the online-upgrade question:
Options | Allowed Values | Default Value | Recommended Value |
|---|---|---|---|
Do you want to make an online installation (Y/N)? | Y, y, N, n | Y | .tar files). Press Enter to accept the default Y. |
Step 6. Select QMetry Report from the upgrade menu
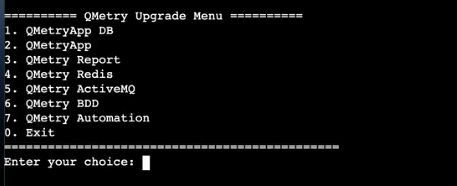
Type 3 to select QMetry Report. The script prints the recommended CPU and memory guidance, then follows one of two paths depending on whether the Report CDC and Sync containers already exist.
Step 7. Respond to Upgrade Prompts
The script determines the path based on whether the Report CDC and Sync containers already exist.
Scenario A — Existing installation (CDC & Sync running):
The script backs up the existing config.properties, stops and removes the old CDC and Sync containers, cleans up old images, and starts the new CDC and Sync containers. No MQ or resource prompts appear. For an offline upgrade you are asked for the directories containing qmetrycdc.tar and qmetrysync.tar.
Scenario B — Fresh installation (CDC & Sync not running)
The script verifies the Report database container exists (if not, it prints “QMetry Report database container is not running. Contact QMetry Support!” — stop and contact support). Database settings are read automatically from config.properties; you are then prompted for:
Prompt | Default | Example |
|---|---|---|
Enter MQ URL | - | Message Queue broker URL (e.g. tcp://localhost:61616) |
Enter MQ UserName | — | MQ broker username |
Enter MQ Password | — | MQ broker password |
Enter Maximum memory to allocate for CDC app in GB(s) | 4 | Memory in GB (number only) |
Enter Maximum memory to allocate for Sync app in GB(s) | 8 | Memory in GB (number only) |
Enter Number of CPU's to allocate for CDC app | 4 | Number of CPUs (number only) |
Enter Number of CPU's to allocate for Sync app | 4 | Number of CPUs (number only) |
For an offline fresh install you are additionally asked for the directories containing qmetryreportdb.tar, qmetrycdc.tar, and qmetrysync.tar.
The script installs the Report database container using reportdb.yml, starts the CDC and Sync containers, and initializes the sync job. Wait for execution to complete.
Note
Depending on your data this process can take time as it performs a full QMetry Data Sync. Users can continue to use the QMetry Application during this time, but QMetry custom reports remain inaccessible while syncing is in progress.
Step 8. Configure Force Sync of Reports and verify
In the QMetry UI, under the Sync Data tab, set the Report Server URL to your report server domain URL followed by the reports sync port, click Test, then Test & Save, then Sync Data.
Confirm all containers are running and check logs / the Report UI:
docker ps
Ask Support
If you face any issues during the upgrade process, generate a support ticket on the Support Portal for assistance.