QMetry and Reports Offline Installation on Linux - 3 Tier
In this guide, we'll run you through the installation of QMetry Database, QMetry Test Management application, and QMetry Reporting tool on a server without an internet connection.
This document contains detailed steps regarding how to download QMetry application’s docker image and the Report application’s docker image from the docker repository and how to move them to another machine for installation.
QMetry runs in Docker containers on Apache Tomcat 11.0.5, MySQL 8.4.8, and OpenJDK 17.0.2.
3 Tier Install
3 Tiers | Installations |
|---|---|
Server 1 | QMetry Application |
Server 2 | QMetry Database |
Server 3 | QMetry Reports and QMetry Reports Database |
Pre-requisites
Confirm every item in the Pre-requisites for QMetry Application and Report Server Installation document. After that confirm the following:
Prerequisite | What to confirm |
|---|---|
Required commands | unzip, wget, curl, vim and Docker commands are installed. |
Operating Systems | CentOS, RHEL-7 and RHEL-8, Ubuntu 24.04 |
Docker Version | 20.10.13 |
Docker Compose Version | v2.5.0 |
Installation files | Get the |
root user | Ensure you have root user access. To install using a non-root user, refer to Installing QMetry as a Standard User before starting the install on both QMetry and Report servers. |
Protocol | QMetry application and Report both should be configured either on https or http. For Jira integration with QMetry, QMetry and Jira should run on the same protocol. |
In addition to these, ensure the following:
Configure docker service on QMetry Application, QMetry DB, and Report servers to start automatically on reboot of servers.
The following Ports should be open:
Installation
Ports that need to be enabled and should be available for use
QMetry Database Server
3306
QMetry Application
80/443
QMetry Report
80/443, 8080 & 3306
QMetry Application and Report Servers should be able to communicate over 80/443 Ports and Database Server 3306/DB Ports. Ports 8080 and 3306 should be enabled/open on the Reports Server to allow connections from the QMetry application server.
Ports 80/443 and 3306 on the respective servers should be free and not in use by other applications. QMetry App server should be able to communicate with the reports server on port 3306.
Download Docker Images of QMetry and Report
Follow these steps on the Internet-enabled machine to download QMetry and Report Docker images.
Docker Login
Contact QMetry Support if you do not have docker credentials.
docker login
Pull QMetry Application Docker Image
docker pull qmetry/qmetry:latest
After the process is finished, verify the Docker image has been downloaded successfully.
docker images
Save QMetry Application's Docker Image
Save QMetry application's Docker image as a .tar file. You can change the path of the .tar file in the following command.
docker save -o /opt/qtm/qmetryapp.tar
qmetry/qmetry:latest
Download and Save QMetry Report CDC and Sync Docker Images.
Download the QMetry Report CDC image.
docker pull qmetry/qmetry:cdc
Save the image.
docker save -o /opt/qtm/qmetrycdc.tar
qmetry/qmetry:cdc
Download the QMetry Report Sync image.
docker pull qmetry/qmetry:sync
Save the image.
docker save -o /opt/qtm/qmetrysync.tar
qmetry/qmetry:sync
Verify the downloaded images.
docker images
Download and Save QMetry Database Docker Image
docker pull qmetry/qmetry:appdb848
docker save -o /opt/qtm/qmetrydb.tar
qmetry/qmetry:appdb848docker images
Download and Save Report Database Docker Image
docker pull qmetry/qmetry:reportdb848
docker save -o /opt/qtm/qmetryreportdb.tar qmetry/qmetry:reportdb848
docker images
Transfer Files
Transfer
qmetrydb.tarto the QMetry DB server.Transfer
qmetryapp.tarto the QMetry Application server.Transfer
qmetrycdc.tar,qmetrysync.tar,qmetryreportdb.tarto the Report server.
Install the QMetry Database
To install the QMetry database, perform the following steps:
Extract the Installation Files
Download and place the
QMetry_Linux_Installer.zipfile on the QMetry DB server in the same directory as theqmetrydb.tarfile.On the DB server, navigate to the directory where the .tar file has been placed and execute the following command.
sudo docker load -i qmetrydb.tar
Run the following command to unzip the QMetryRDS.zip file.
sudo docker images
sudo su
unzip QMetry_Linux_Installer.zip
Run the installer
cd QMetry_Linux_Installer
chmod +x install.sh
./install.sh
Online Install Prompt
Options
Allowed Values
Default Value
Recommended Value
Do you want to make an online installation (Y/N)?
Y, y, N, n
Y
N
Verify Docker
If prompted, enter the Docker credentials shared as part of the installation package.
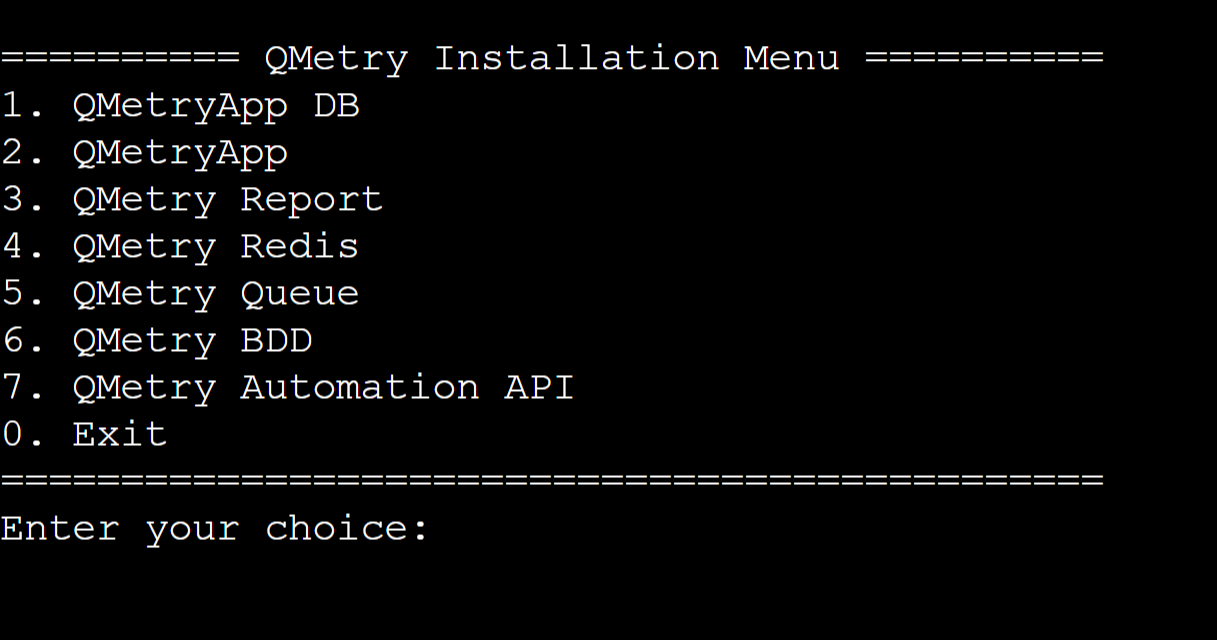
Main Installation Menu
Enter 1 to install the QMetry database.
Enter the Following Parameters
Options
Details
Example
Enter QMetry database password for root user
Enter QMetry Application Database Password for the root user.
QMetry@123
After successful installation of QMetry DB, you will see the message:
QMetry RDS Installation is complete.Type 0 to exit the installer.
Configure Remote Database Access
docker exec -it qmetryapp_db bash
mysql -uroot -p;
GRANT ALL PRIVILEGES ON *.* TO 'root'@'%';
Verify MySQL
Once the script finishes executing, run docker ps to check if the MySQL Docker container is available with the name: qmetryapp_db
Note
MySQL 8.4.8 is installed on port 3306 with username root and password as specified in step 6.
Install QMetry Application
To install QMetry Application, perform the following steps:
Extract the installation files
Copy the QMetryApp.zip file that you received from QMetry Support to the server. Go to the directory that contains the file, and run the following command.
unzip QMetry_Linux_Installer.zip
Run the installer
cd QMetry_Linux_Installer
sudo su
chmod +x install.sh
./install.sh
Online Install Prompt
Options
Allowed Values
Default Value
Recommended Value
Do you want to make an online installation (Y/N)?
Y, y, N, n
Y
N
Docker VerificationDocker Verification
Enter the docker credentials shared as a part of the installation package.
Main Installation Menu
Enter 2 to install the QMetry application.
Specify the application data directory
Enter a directory path on the host machine to store QMetry data such as attachments, licenses, imports, and exports. You can specify any valid path, and the installer creates the directory automatically if it does not exist.
Options
Example
Please enter QMetry application directory
/opt/QMetry_Linux_Installer
Enter the configuration parameters
Options
Details
Default Value
Example
Enter QMetry database hostname
Enter QMetry Database Host as DNS/IP Address
localhost
192.168.0.100
Enter the QMetry database port
Enter QMetry Database Port. If it is unchanged, use "3306" as the Database port.
3306
3306
Enter QMetry database schema
QMetryApplication Database schema name.
qmetry
qmetry
Enter QMetry database username
Enter Database's Username
-
root
Enter QMetry database password for root user
Enter QMetryApplication Database Password for the root user.
-
QMetry@123
Enter Email for QMetryadmin user
Enter QMetryuser email address for Admin.
-
Enter password for QMetryadmin user
Enter QMetryuser password for Admin.
-
Admin@123
Enter Min. Heap Memory for the web server in GB
Enter Heap Memory in GB
2
2
Enter Max. Heap Memory for the web server in GB
Enter Heap Memory in GB
4
4
Enter QMetryDatabase Connection Pool Size
Enter Pool Size in number format
100
100
The installation may take a while. When it finishes QMetry displays the message "QMetry Application Installation is complete".
Type 0 to exit the installer.
Confirm that the containers are running. Docker lists the installed containers with their container IDs and names.
docker ps
Get QMetry License and Install it.
Choose the option that matches your license type.
For users evaluating QMetry: Use the evaluation license, valid for 30 days, that you received with the installation.
For users requiring a commercial license
QMetry Support needs your server's domain name and MAC address.
Find the MAC address and email it to qtmprofessional@qmetrysupport.atlassian.net.
ifconfig (MAC address of Ethernet card, e.g., eth0/eth1)
When you receive license.key from QMetry Support, follow the Steps to Apply License file.
Access the Application
Open the QMetry application in a browser at the following address, where you substitute your own value. http://<your IP address OR domain name>
Log in with the Default QMetry credentials.
Username: admin
Password: <user specified password in Step # 7 >
Configure additional Tomcat settings
QMetry installs with a default configuration for minimum and maximum heap memory. You can adjust these settings to match your hardware configuration. For more information, refer to Additional Configuration for more details.
Note
Recommended: Back up the application data directory on a regular schedule. Periodic backups help prevent data loss if a disaster occurs.
Install QMetry Reports
Note
Reports installation requires Redis Server and ActiveMQ Server. Refer to the Redis and Automation installation sections for setup steps.
Pre-requisites
Before you install QMetry reports, verify the following requirements.
QMetry App is installed and running.
QMetry App DNS/IP is configured in profile section.
Active MQ and Redis containers are running and configured in QMetry App.
The services are reachable from the report server: Redis (6379), ActiveMQ (61616, 8161), App (80, 443), App DB (3306).
Download Docker Images of Reports
Docker Login
Contact QMetry Support to get your Docker credentials.
docker login
Download and Save the Report Docker Images
docker pull qmetry/qmetry:cdc
docker pull qmetry/qmetry:sync
docker pull qmetry/qmetry:reportdb848
Save the images
docker save -o /opt/qtm/qmetrycdc.tar
qmetry/qmetry:cdc_docker save -o /opt/qtm/qmetrysync.tar
qmetry/qmetry:sync
docker save -o /opt/qtm/qmetryreportdb.tar
qmetry/qmetry:reportdb848
docker images
Transfer the Files
Transfer the
qmetrycdc.tar,qmetrysync.tar, andqmetryreportdb.tarfiles to the Report serverLoad the Images
sudo docker load -i qmetrycdc.tar
sudo docker load -i qmetrysync.tar
sudo docker load -i qmetryreportdb.tar
Verify the Images
sudo docker images
Steps to Install QMetry Reports
To install QMetry Reports on the second server, perform the following steps:
Get the installation zip file
sudo su -
cd /opt
unzip QMetry_Linux_Installer.zip
cd QMetry_Linux_Installer/
Run Reports Installer
chmod +x install.sh
./install.sh
Online Install Prompt
Options
Allowed Values
Default Value
Recommended Value
Do you want to make an online installation (Y/N)?
Y, y, N, n
Y
N
Docker Verification
Enter docker credentials that were shared as part of the installation package.
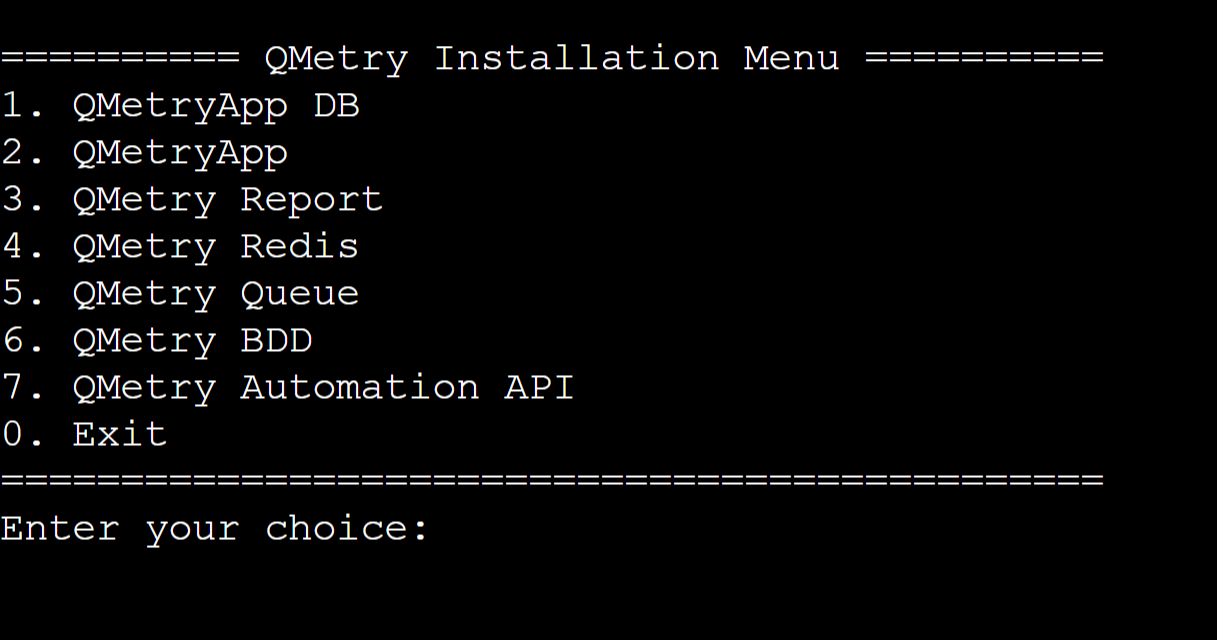
Main Installation Menu
Enter 3 to install QMetry Reports.
Enter the report configuration parameters
Options
Details
Example
Enter App Database Host URL
Enter Database Host Public IP/DNS of QMetry application.
10.0.8.166
Enter App Database Port
Enter Database Port of QMetry application.
3306
Enter App Database Username
Enter Database username of QMetry application.
root
Enter App Database Password
Enter Database password of QMetry application.
root
Enter App Database Schema Name
Enter Database schema name of QMetry application.
qmetry
Enter Report Database Host URL
Enter Database Host Public IP/DNS of QMetry Report.
10.0.8.221
Enter Report Database Port
Enter Database Port of QMetry Report Database.
3306
Enter Report Database Username
Enter Database username of QMetry Reports Database.
root
Enter Report Database Password
Enter Database password of QMetry Reports Database.
root
Enter Report Database Schema
Enter Database schema name of QMetry Reports Database.
qtmanalytics
Enter MQ URL
Enter MQ Active URL
tcp://10.0.8.166:61616
Enter MQ UserName
Enter MQ Username
admin
Enter MQ Password
Enter MQ Password
admin
Enter maximum memory to allocate for CDC app in GB
Maximum memory allocation for the CDC container:
Entered memory would be used by the sync job while running full sync of data.
Enter 25% of total memory available on the server. For example, if the memory on the server is 24 GB, enter 6.
A minimum of 4 GB memory must be allocated.
To check the total memory, run the command: free -h
4
Enter maximum memory to allocate for Sync app in GB
Maximum memory allocation for the Sync container:
Entered memory would be used by the sync job while running full sync of data.
Enter 70% of total memory available on the server. For example, if the memory on the server is 24 GB, enter 17.
A minimum of 8 GB of memory must be allocated.
To check the total memory, run the command: free -h
4
Enter number of CPU’s to allocate for CDC app
Number of CPUs to allocate for the CDC container. (The default is 4)
4
Enter number of CPU’s to allocate for Sync app
Number of CPUs to allocate for the Sync container:
Allocate 70% of the available CPUs. For example, if CPU has 8 cores, enter 6.
A minimum of 4 CPU cores must be allocated.
To check total CPUs, run the command : lscpu
4
Enter the report configuration parameters
Options
Options
Options
Example
Enter QMetry Database Connection Pool Size
Enter Pool Size in number format.
100
100
The installation may take a while. When it finishes, QMetry displays the message: QMetry Application Installation is complete.
Confirm that the containers are running.
docker ps
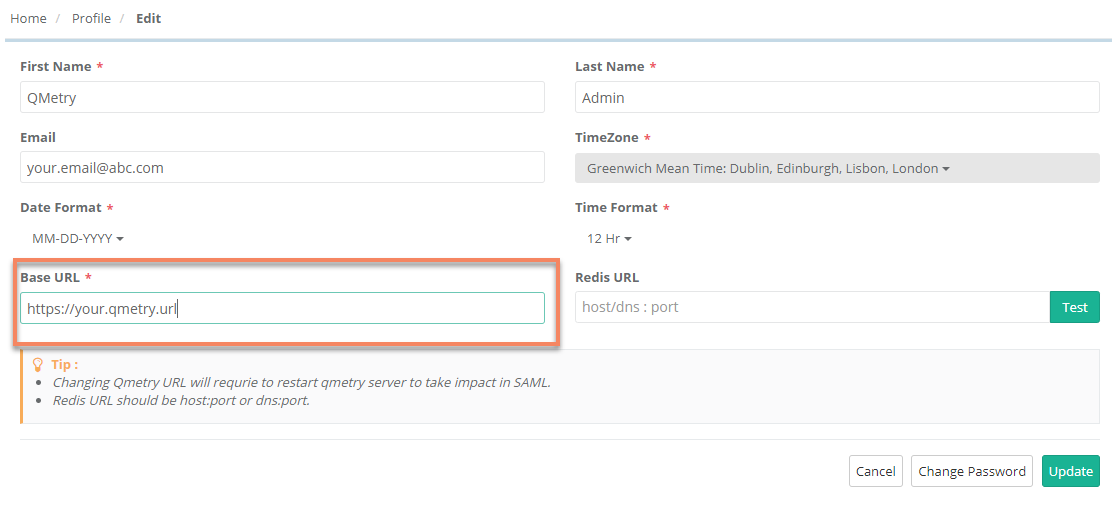
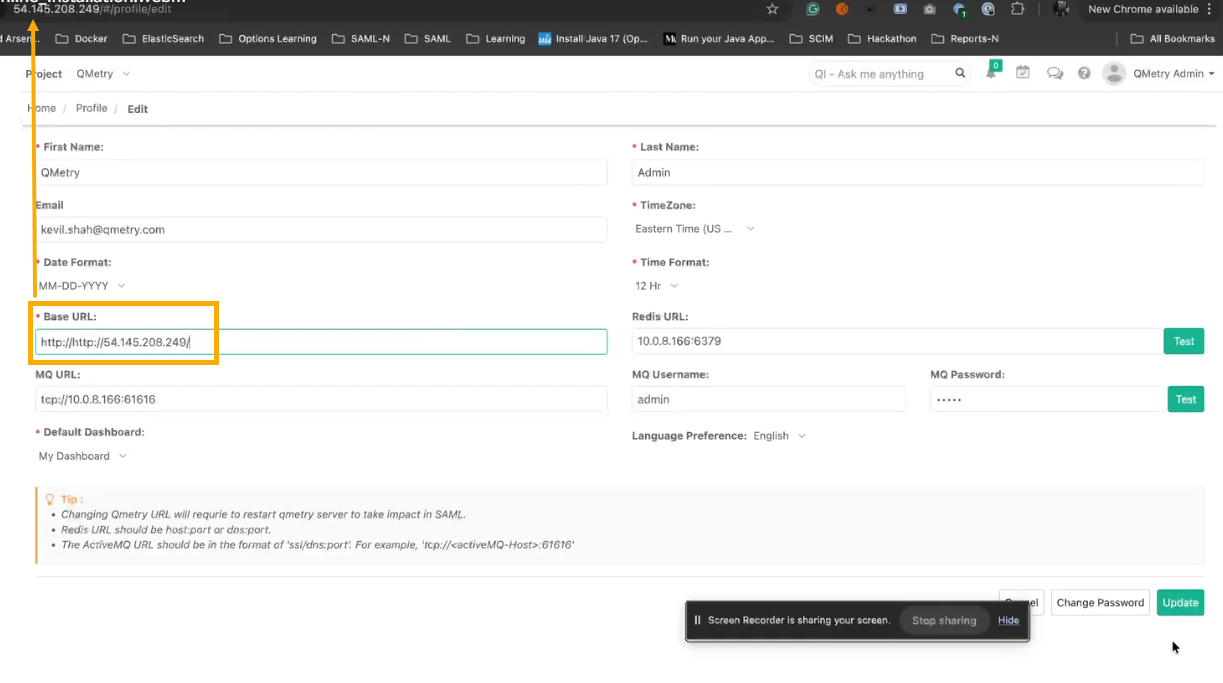
Update the Base URL
Log into QMetry and go to your Profile section, edit the Base URL with QMetry app URL. When the full sync is complete, exit the installation by entering 0.
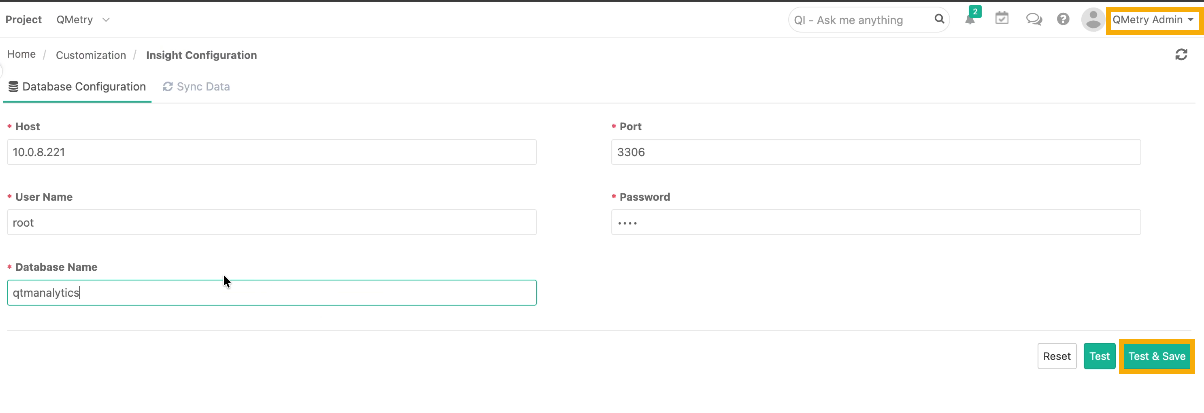
Configure the database connection
Configure the report database connection under Insight Configuration in the QMetry application. To configure the connection, perform the following steps:
Login to QMetry with administrator credentials and go to Customizations.
Select Insight Configuration and open Database Configuration tab.
Under Database Configuration tab, enter the following details:
Host: Enter Report Database Host URL from the report configuration table.
Port: 3306
Username: <Enter Report database username>
Password : <Enter Report database password>
Database Name: <Report DB schema specified during installation>
Select Test to confirm a successful connection, and then select Test & Save.
Set up the report data sync
On the Sync Data tab, set up the Report Data Sync from your reports server to QMetry Reporting.
Report Server URL: Enter your report server domain URL followed by port 8081. Confirm that port 8081 is open on the report server.
Select Test to confirm a successful connection and then select Test & Save.
You can start using QMetry Reports when the sync is completed. QMetry remains available during this time.
Note
Run Sync Data the first time after you install QMetry reports installation. The time that the sync takes depends on the amount of data in QMetry. You can monitor sync progress and status in the interface. QMetry custom reports are not accessible while the sync runs. Run the sync only during off-peak hours.
Install Automation API Features
Installing the Automation API with your on-premise QMetry installations will enable several automation API related features including faster automation result file imports into QMetry. If you plan to use Automation APIs to import test results into QMetry, refer to Install Automation API Feature for Offline Installations.
Get support
If you are facing any issues during the installation process, kindly generate a support ticket on Support Portal for assistance.