Install/Upgrade Automation API Feature for Offline Installations
This guide covers installing or upgrading the QMetry Automation API on an on-premise QMetry deployment that has no direct internet access.
You download the Docker images on an internet-enabled machine, transfer them as .tar files, then load and configure each component on the target servers.
For details on API behaviour changes, see the Automation API Changes with QMetry v8.13.0 documents.
Before you Start
Choose a Deployment Option
Option 1: Shared server: install the Automation API on the same server that runs the QMetry Application.
Option 2 (recommended): Dedicated server: for heavy Automation API usage, install ActiveMQ, the Automation API, and Redis caching on a separate server.
If you are opting for Option 2, the following are hardware requirements for Active MQ and Automation API Server.
Small Teams < 50 Users | Medium Teams < 500 Users | Large Teams 500+ Users | ||||
Min | Recommended | Min | Recommended | Min | Recommended | |
Memory | 4 Gb | 8 Gb | 8 Gb | 16 Gb | 16 Gb | 32 Gb |
CPUs | 2 Core | 4 Core | 4 Core | 12 Core | 12 Core | 24 Core |
Pre-requisites
Confirm all of the following before you begin:
QMetry Application is installed and running. Complete Steps 1–8 of the Install QMetry Application section (through entering the Base URL); Step 8 is mandatory. Refer QMetry and Reports Offline Installation on Linux - 2 Tier.
Redis and ActiveMQ servers are configured with the QMetry Application. This guide installs both if you have not already.
The following should be installed on the server:
CentOS, RHEL-8, RHEL-9 and RHEL 10
Docker Version 20.10.13
Docker Compose Version v2.40.3
Yum-tools
Every server supports the commands: unzip, curl, and vim.
You can run installation commands as the root user.
You have
QMetry_Linux_Installer.zip, plus Docker credentials, from QMetry Support.Each target server has Docker and Docker Compose installed, plus yum-utils, and Docker is set to start automatically on reboot.
An internet-enabled machine is available to download the images, and it supports the docker command.
Required Ports
Installation | Ports that need to be enabled and should be available for use |
|---|---|
Redis Caching Server | 6379 |
Active MQ Server | 8181 & 61616 |
Automation API Server | 8081 |
Note
Perform the steps in order: download and transfer all images first, then install Redis, ActiveMQ, and the Automation API.
During an upgrade, the installer detects the existing component and skips the configuration prompts, reusing stored values.
Step 1. Download and transfer the Docker Images
Perform this step on an internet-enabled machine. You will pull each image, save it as a .tar file, and transfer it to the matching offline server.
1.1 Log in to the Docker registry
docker login
Enter the Docker credentials when prompted. Contact QMetry Support if you do not have them.
 |
1.2 Redis Image
Pull, verify, save, and transfer the Redis image:
docker pull qmetry/qmetry:redis741
docker images
docker save -o /opt/qtm/qmetryredis.tar
qmetry/qmetry:redis741
Then transfer qmetryredis.tar to the QMetry Redis server.
1.3 ActiveMQ image
docker pull qmetry/qmetry:redis741
docker images
docker save -o /opt/qtm/qmetryredis.tar
qmetry/qmetry:redis741
1.4 Automation API Image
docker pull qmetry/qmetry:automation_latest
docker images
docker save -o /opt/qtm/qmetryautomation.tar qmetry/qmetry:automation_latest
Then transfer qmetryautomation.tar to the QMetry Automation API server.
Note
You can change the .tar output path in each docker save command. Use docker images after each pull to confirm the image downloaded successfully.
Step 2. Install/Upgrade Redis Server
Note
QMetry supports Redis 7.0.10 and later. The Docker image currently installs Redis 7.4.1.
2.1 Load the Image
On the QMetry Redis server, go to the directory holding the .tar file and load it, then verify:
sudo docker load -i qmetryredis.tar
sudo docker images
 |
2.2 Extract the installer
unzip QMetry_Linux_Installer.zip
cd QMetry_Linux_Installer
2.3 Run the Installer
sudo su
chmod +x install.sh
./install.sh
At the online-installation prompt, enter N (offline). Installation may take a while.
Options | Enter Value |
|---|---|
Do you want to make an online installation (Y/N)? | N |
Enter the docker credentials and select 4 in the QMetry Installation Menu.
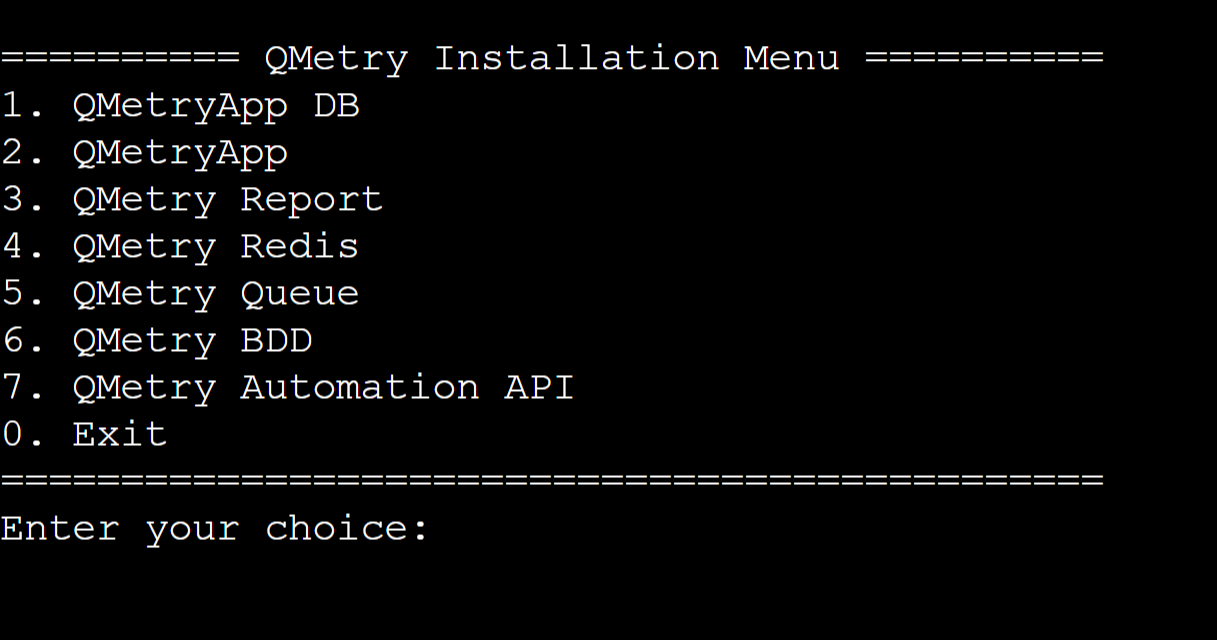
The installation may take a while.
2.4 Verify the containers
docker ps
 |
2.5 Configure Redis in QMetry
Log into the QMetry application, perform the following steps:
Go to "Admin" Profile and Edit the Profile.
Update QMetry Redis URL
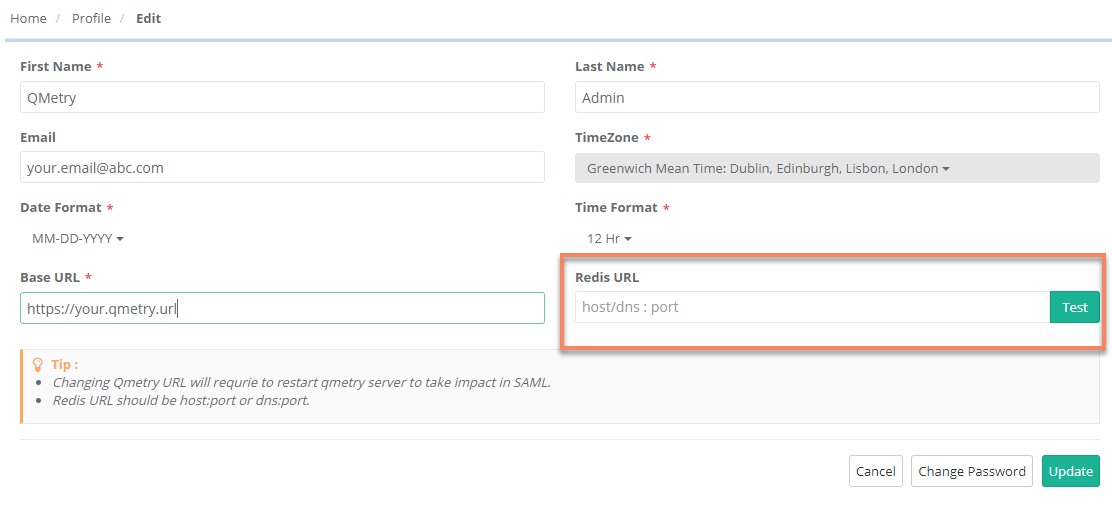 |
For more details on Redis, visit https://redis.io/.
Note
If you face any issues in the QMetry Application after configuring Redis, then restart the QMetry Application Docker container after Step 2.3.
Step 3. Install/Upgrade ActiveMQ
Get the QMetry_Linux_Installer.zip file from QMetry Support and copy it to the server for Automation API installation.
3.1 Load the Image
On the ActiveMQ server, load and verify the transferred image:
sudo docker load -i qmetryactivemq.tar
sudo docker images
3.2 Extract the installer
unzip QMetry_Linux_Installer.zip
cd QMetry_Linux_Installer
3.3 Run the Installer
sudo su
chmod +x install.sh
./install.sh
Options | Enter Value |
|---|---|
Do you want to make an online installation (Y/N)? | N |
Respond N to the online-installation prompt and enter the Docker credentials. At the QMetry Installation Menu, select 7.
In case of upgrade, value for parameters won't be asked.
Options | Example |
|---|---|
Enter activemq username | admin |
Enter activemq password | admin |
.tar file directory path | For offline upgrade, the directory holding the image .tar, e.g. /opt/qtm |
The installation may take a while.
3.4 Verify the container
docker ps
3.5 Configure ActiveMQ in QMetry
After the above steps are completed, log into the QMetry application.
Go to "Admin" Profile and Edit the Profile.
Update MQ URL, MQ Username, and MQ Password.
The ActiveMQ URL should be in the format of protocol://<host>:port
For example, "tcp://<activeMQ-Host>:61616"
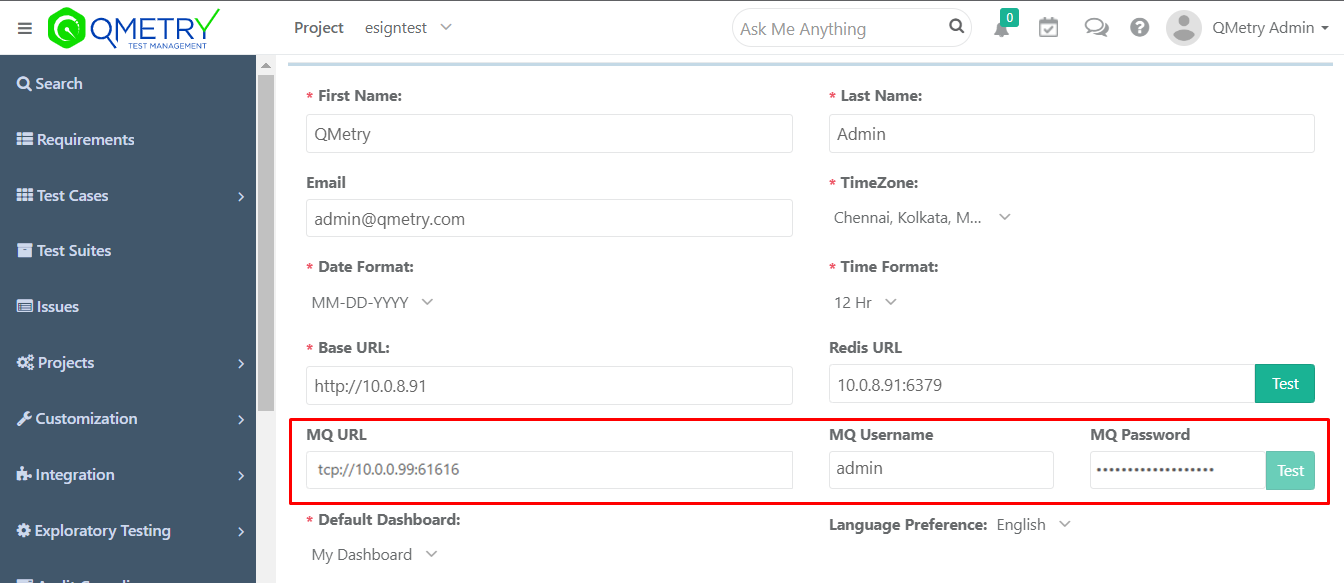 |
3.6 Restart the QMetry Application docker container to apply the change.
Step 4: Install / Upgrade Automation API Server
4.1 Load the image
On the Automation API server, load and verify the transferred image:
sudo docker load -i qmetryautomation.tar
sudo docker images
4.2 Extract the installer
unzip QMetry_Linux_Installer.zip
4.2 Run the Installer
sudo su
chmod +x install.sh
./install.sh
Options | Enter Value |
|---|---|
Do you want to make an online installation (Y/N)? | N |
Respond Y to the online-installation prompt and enter the Docker credentials. At the QMetry Installation Menu, select 7 (QMetry Automation API).
4.3 Enter configuration parameters
Provide these values when prompted (skipped during an upgrade):
Options | Details | Default Value | Example |
Enter QMetry database host (localhost) | For AWS, use the private IP of the instance hosting the QTM database | localhost | QTM Application's database host |
Enter QMetry (QTM) database port (3306) | 3306 | 3306 | 3306 |
Enter QMetry (QTM) database schema (qmetry) | qmetry | qmetry | qmetry |
Enter QMetry (QTM) database user (root) | root | root | root |
Enter QMetry (QTM) database password | - | qmetry | qmetry |
Enter QMetry (QTM) database min connection (32) | - | 32 | 32 |
Enter QMetry (QTM) database max connection (50) | - | 50 | 50 |
Enter min threads (2) | - | 2 | 2 |
Enter max threads (2) | - | 2 | 2 |
Enter Redis host (localhost) | Note: In case of AWS installation enter the private IP of the AWS instance where Redis is installed. | localhost | redis host |
Enter Redis port (6379) | - | 6379 | 6379 |
Enter MQ URL (tcp://localhost:61616): | Note: In case of AWS installation enter the private IP of the AWS instance where Redis is installed. EG: tcp://10.0.0.16:61616 | tcp://localhost:61616 | tcp://<activeMQ-Host>:61616 |
Enter MQ user (admin) | - | Match your ActiveMQ password | admin |
Enter MQ password | - | - | - |
.tar file directory path | - | - | For offline upgrade, the directory holding the image .tar, e.g. /opt/qtm |
The installation may take a while.
4.4 Verify the container
docker ps
Confirm the automation container appears in the list. Installation is complete once it is running.
 |
Get support
For any installation issue, raise a ticket on the Support Portal.