QMetry and Reports Installation on Linux - 2 Tier
This guide describes how to install QMetry Test Management application and QMetry Reports in a 2-tier Linux environment.
QMetry runs in Docker containers on Apache Tomcat 11.0.5, MySQL 8.4.8, and OpenJDK 17.0.2.
2-Tier Installation
The two-tier deployment uses two Linux servers. The following table lists the role of each server.
2 Tiers | Installations |
|---|---|
Server 1 | QMetry Application and QMetry Database |
Server 2 | QMetry Reports |
Pre-requisites
Confirm every item in the Pre-requisites for QMetry Application and Report Server Installation document. After that confirm the following:
Prerequisite | What to confirm |
|---|---|
Operating System | You use RHEL 8, 9, or 10, or Ubuntu 24.04 (the only supported OS). |
Required commands | unzip, curl, and yum are installed on every server. |
Installation files | You have the files |
Security Protocol | Run the QMetry application and QMetry Reports on the same protocol, (HTTPS or HTTP). If you integrate with Jira over HTTPS, run QMetry on HTTPS as well. Both must use the same protocol. |
Root access | Docker installation requires root user access. For a non-root install, refer to Installing QMetry as a Standard User. |
Storage | Docker stores data under /var/lib/ by default; the installer also asks for a QMetry data location. Ensure both directories have enough disk space. |
Required Ports
Component | Ports to open |
|---|---|
QMetry Application | 80/443, and 3306 |
QMetry Reporting tool | 80/443, 8080 and 3306 |
Between the two servers, confirm that:
The application and report servers communicate over ports 80 and 443.
The report server reaches the database on port 3306 (or your configured database port).
The application server reaches the report server on ports 8080 and 3306.
Install QMetry Application
To install QMetry Application, perform the following steps:
Extract the installation files
Copy the QMetry_Linux_Installer.zip file to the server. Go to the directory, and extract it.
unzip QMetry_Linux_Installer.zip
Run the installer
cd QMetry_Linux_Installer
sudo su
chmod +x install.sh
./install.sh
Online Install Prompt
Options
Allowed Values
Default Value
Recommended Value
Do you want to make an online installation (Y/N)?
Y, y, N, n
Y
Y
Docker Verification
Enter the docker credentials shared as a part of the installation package.
Main Installation Menu
Enter 2 to install the QMetry application.
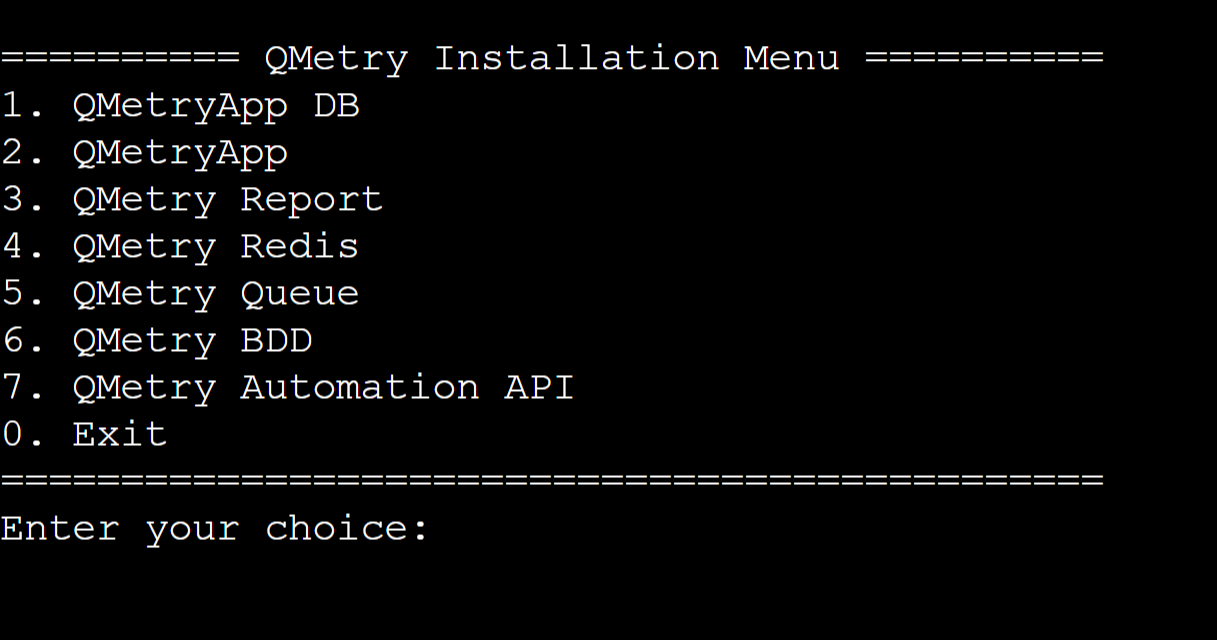
Specify the data directory
Enter a directory path on the host machine to store QMetry data such as attachments, licenses, imports, and exports. You can specify any valid path, and the installer creates the directory automatically if it does not exist.
Options
Example
Please enter QMetry application directory
/opt/qmetryapp
Enter the configuration parameters
Options
Default Value
Example
Enter QMetry database schema
qmetry
qmetry
Enter QMetry database password for root user
-
QMetry@123
Enter Email for QMetryadmin user
-
Enter password for QMetryadmin user
-
Admin@123
Enter Min. Heap Memory for the web server in GB
2
2
Enter Max. Heap Memory for the web server in GB
4
4
Enter QMetryDatabase Connection Pool Size
100
100
The installation may take a while. When it finishes QMetry displays the message "QMetry Application Installation is complete".
Run docker ps to list the installed containers with their IDs and names.
docker ps

Exit the installer by typing 0.
Apply your License
Choose the option that matches your license type.
For users evaluating QMetry: Use the evaluation license, valid for 30 days, that you received with the installation.
For users requiring a commercial license
QMetry Support needs your server's domain name and MAC address.
Find the MAC address with ifconfig, then email both to qtmprofessional@qmetrysupport.atlassian.net.
Access the Application
Open the application in a browser: http://<IP Address or Domain Name>
Log in with the Default QMetry credentials.
Username: admin
Password: <user specified password in Step # 7 >
The MySQL runs on port 3306 with username root, the password from Step 4, and the schema from Step 7.
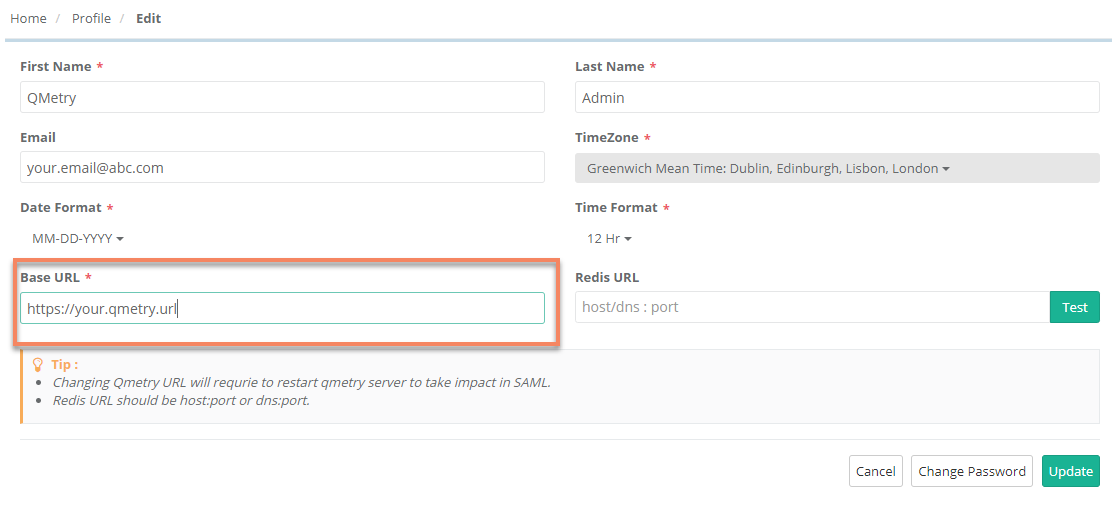
Update the administrator profile
Log in, open the Admin profile, and edit it:
Go to "Admin" Profile and Edit the Profile.
Update the administrator email in the Email field.
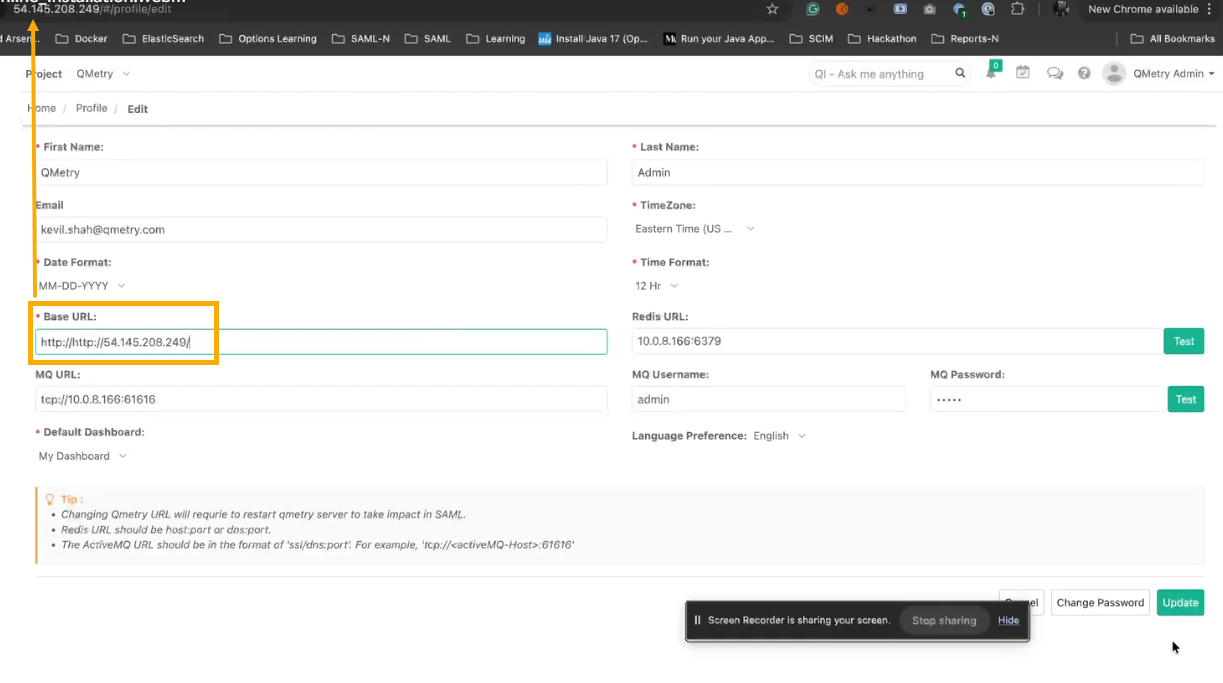
In the Base URL field, enter your QMetry URL.
Select Update.
Configure additional Tomcat settings
QMetry installs with a default configuration for minimum and maximum heap memory. You can adjust these settings to match your hardware configuration. For more information, refer to Additional Configuration for more details.
Note
Recommended: Back up the application data directory on a regular schedule. Periodic backups help prevent data loss if a disaster occurs.
Install QMetry Reports
Note
Reports installation require Redis Server and ActiveMQ Server. Refer to the Redis and Automation installation sections for setup steps.
Pre-requisites
Before you install QMetry reports, verify the following requirements.
QMetry App is installed and running.
QMetry App DNS/IP is configured in profile section.
Active MQ and Redis containers are running and configured in QMetry App.
The services are reachable from the report server: Redis (6379), ActiveMQ (61616, 8161), App (80, 443), App DB (3306).
Steps for QMetry Report Installation
To install QMetry Reports on the second server, perform the following steps:
Get the installation file
Connect to the report server, upload QMetry_Linux_Installer to /opt, and extract it:
sudo su -
cd /opt
unzip QMetry_Linux_Installer.zip
cd QMetry_Linux_Installer/
Run the reports installer
chmod +x install.sh
./install.sh
Online Install Prompt
Options
Allowed Values
Default Value
Recommended Value
Do you want to make an online installation (Y/N)?
Y, y, N, n
Y
Y
Docker Verification
Enter docker credentials that were shared as part of the installation package.
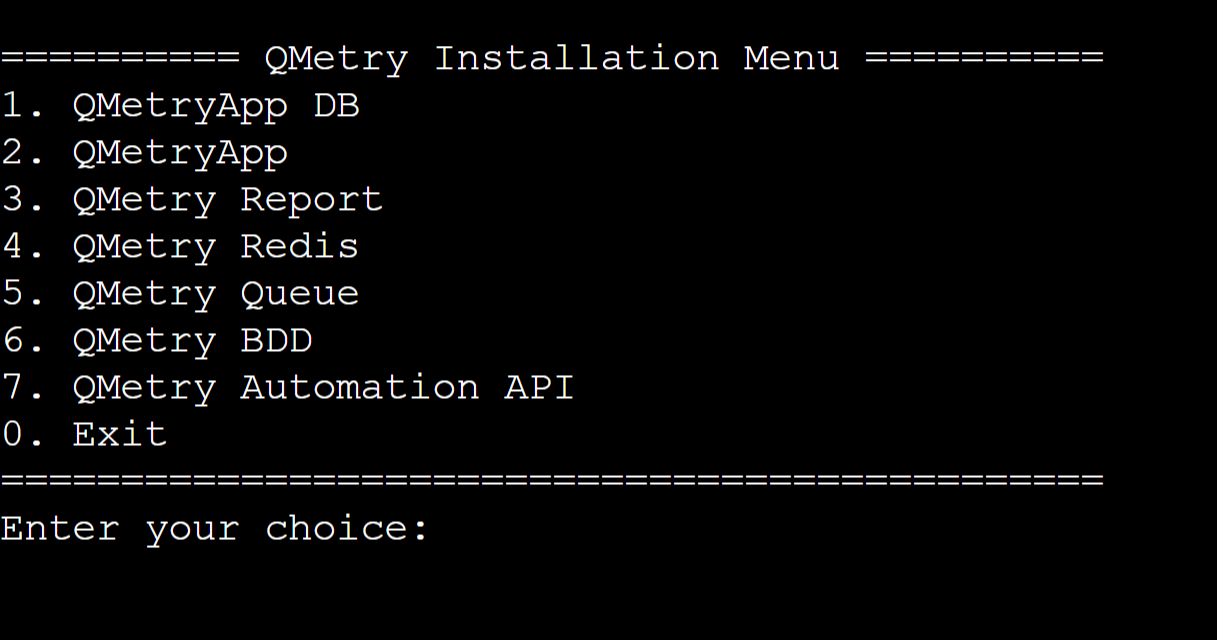
Main Upgrade Menu
Type 3 at the QMetry Installation Menu to install Reports.
Enter the report configuration parameter
Options
Details
Example
Enter App Database Host URL
Enter Database Host Public IP/DNS of QMetry application.
10.0.8.166
Enter App Database Port
Enter Database Port of QMetry application.
3306
Enter App Database Username
Enter Database username of QMetry application.
root
Enter App Database Password
Enter Database password of QMetry application.
root
Enter App Database Schema Name
Enter Database schema name of QMetry application.
qmetry
Enter Report Database Host URL
Enter Database Host Public IP/DNS of QMetry Report.
10.0.8.221
Enter Report Database Port
Enter Database Port of QMetry Report Database.
3306
Enter Report Database Username
Enter Database username of QMetry Reports Database.
root
Enter Report Database Password
Enter Database password of QMetry Reports Database.
root
Enter Report Database Schema
Enter Database schema name of QMetry Reports Database.
qtmanalytics
Enter MQ URL
Enter MQ Active URL
tcp://10.0.8.166:61616
Enter MQ UserName
Enter MQ Username
admin
Enter MQ Password
Enter MQ Password
admin
Enter maximum memory to allocate for CDC app in GB
Maximum memory allocation for the CDC container:
Entered memory would be used by the sync job while running full sync of data.
Enter 25% of total memory available on the server. For example, if the memory on the server is 24 GB, enter 6.
A minimum of 4 GB memory must be allocated.
To check the total memory, run the command: free -h
4
Enter maximum memory to allocate for Sync app in GB
Maximum memory allocation for the Sync container:
Entered memory would be used by the sync job while running full sync of data.
Enter 70% of total memory available on the server. For example, if the memory on the server is 24 GB, enter 17.
A minimum of 8 GB of memory must be allocated.
To check the total memory, run the command: free -h
4
Enter number of CPU’s to allocate for CDC app
Number of CPUs to allocate for the CDC container. (The default is 4)
4
Enter number of CPU’s to allocate for Sync app
Number of CPUs to allocate for the Sync container:
Allocate 70% of the available CPUs. For example, if CPU has 8 cores, enter 6.
A minimum of 4 CPU cores must be allocated.
To check total CPUs, run the command : lscpu
4
After the containers are created, QMetry runs a full sync. On completion you'll see "QMetry Report installation is complete".
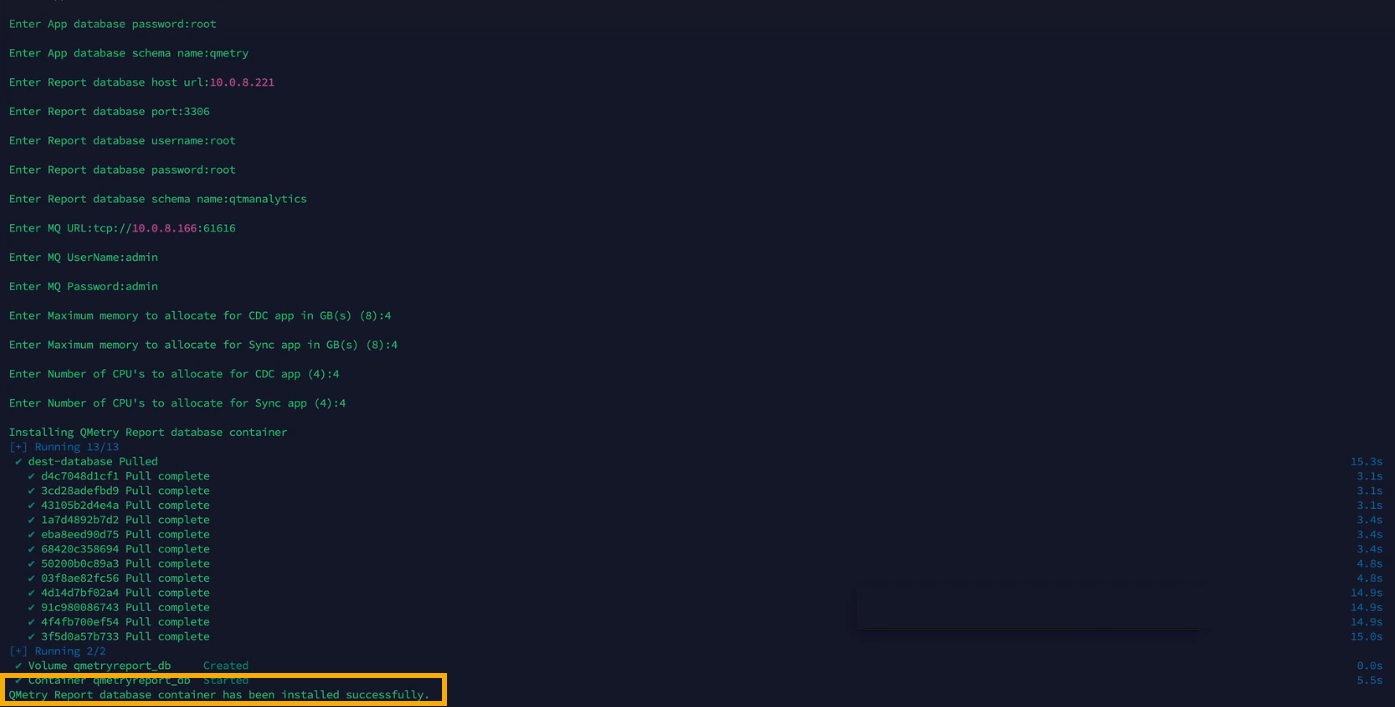
When the full sync completes, type 0 to exit the installer.
Update the Base URL
In QMetry, open your profile and set the Base URL to the QMetry app URL.
Configure the database connection
To configure the connection, perform the following steps:
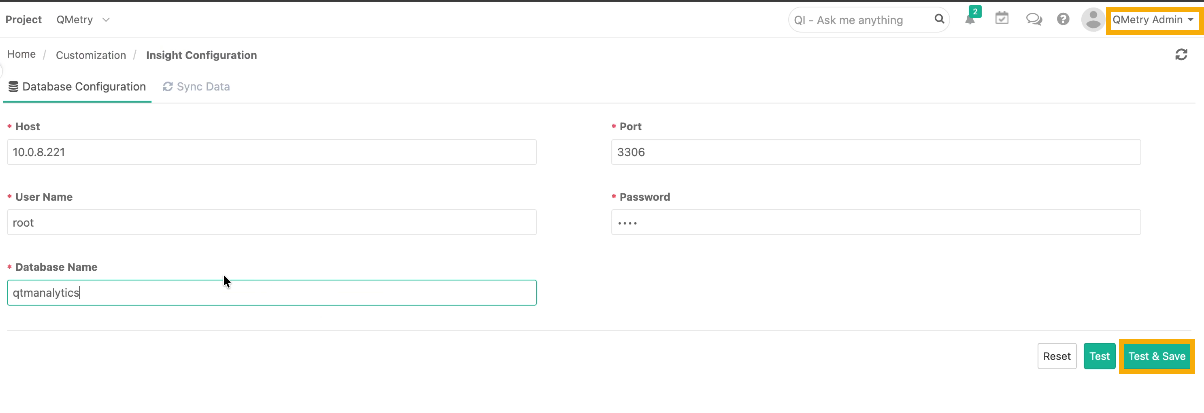
Login to QMetry with administrator credentials and go to Customizations.
Select Insight Configuration and open Database Configuration tab.
Under Database Configuration tab, enter the following details:
Host: Enter Report Database Host URL from the report configuration table.
Port: 3306
Username: <Enter Report database username>
Password : <Enter Report database password>
Database Name: <Report DB schema specified during installation>
Select Test to confirm a successful connection, and then select Test & Save.
Set up the report data sync
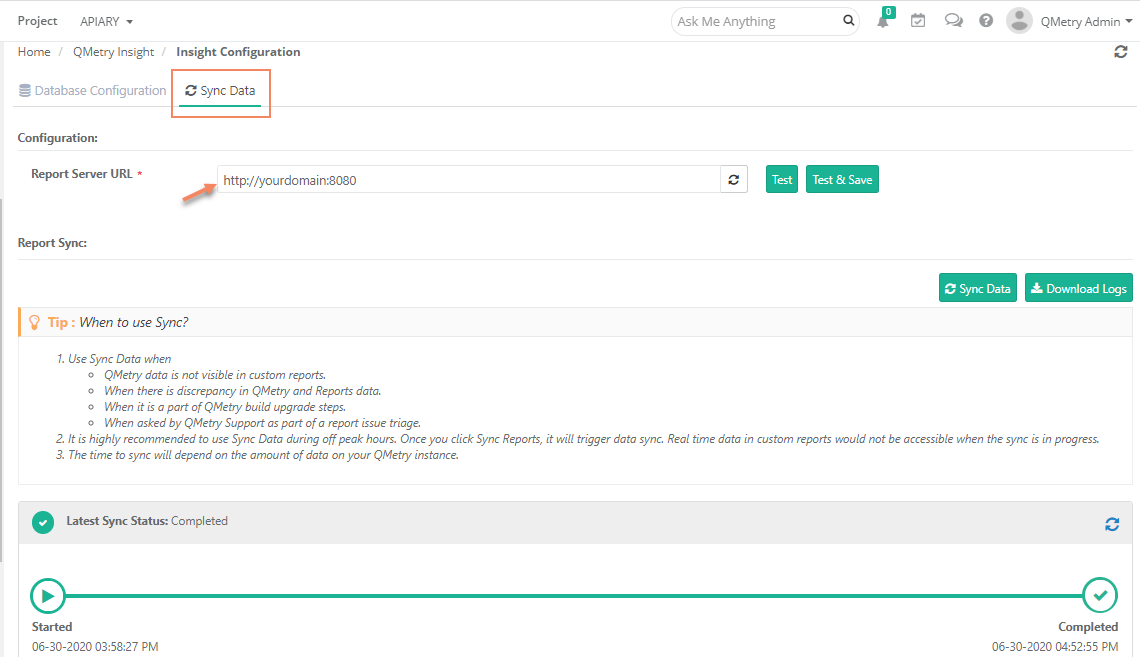
On the Sync Data tab, set up the Report Data Sync from your reports server to QMetry Reporting.
Report Server URL: Enter your report server domain URL followed by port 8080. Confirm that port 8080 is open on the report server.
Select Test to confirm a successful connection and then select Test & Save.
Note
Run Sync Data once, right after installing Reports. Sync time depends on data volume; custom reports are unavailable while it runs, so sync during off-peak hours. QMetry itself stays available.
Start using QMetry Reports when the sync is completed. QMetry remains available during this time.
Install the Redis Caching Server
Redis caching improves overall performance and scalability. To install the Redis Server, refer to Installing Redis Caching Server.
Install the Automation API Features
The Automation API adds several automation API related features to on-premise QMetry installations, including faster automation result files. To use it, refer to Install Automation API Feature for Online Installations.
Get support
For any installation issue, raise a ticket on the Support Portal.